
Noticing a tick stuck to your skin can be unsettling, but knowing exactly what to look for makes all the difference. An attached tick looks like a small, dark sesame seed with visible legs—moles and scabs don’t share those features.
Since tick bites are painless, you might not spot one for hours, which is why a quick visual check matters. The good news is removal is straightforward with fine-tipped tweezers and steady upward pressure.
Clean the bite with soap afterward, then watch for a bullseye rash or fever over the next few weeks.
Stick around—we’ll cover exactly how to spot danger signs and what to do next. This guide walks you through identification, safe removal, and when to call a pro.
At A Glance
- Look for a small dark bump with visible legs, unlike a mole or scab.
- Check if it feels firm and stuck; ticks cannot be wiped or brushed off.
- A feeding tick becomes rounder and turns grayish-blue over time.
- Examine skin after outdoor activities; ticks often hide in warm areas.
- Redness around the bite is common, but not a guaranteed sign of infection.
What Does an Attached Tick Look Like on Skin?
Spotting an attached tick isn’t always obvious, which is part of why they’re so annoying.
On skin, it looks like a small, dark bump — think a new freckle or mole, but with legs.
The tick’s body sits above the skin, its mouthparts buried underneath.
This tick anatomy means it feels firm and stuck — not something you can just wipe off.
Nymphs are poppy-seed size (1–2 mm), adults like sesame seeds (3–5 mm).
If it has been feeding for a few days, it gets rounder and grayish-blue.
Redness around the bite is common, but that does not mean the bite site is infected yet.
It is just the body’s immune reaction to tick spit.
Check for a hard lump too.
If it is stationary and has legs, it is attached and needs immediate removal.
For reliable pest control treatment, always check your skin after outdoor activities.
Early removal reduces your risk of disease and keeps your yard safer.
Using an EPA-registered repellent like 20% Picaridin can help prevent ticks from attaching in the first place.
Is It Attached or Just Crawling?
A tick that is merely crawling is a mobile, uninvited guest, not a permanent resident. An attached tick is stationary, with its body firmly fixed and its head buried beneath the skin.
It looks like a small, dark bump with legs that stay put. The key difference comes down to motion.
If it moves when touched, it is still exploring. If it does not, it has already settled in for a meal.
For effective pest control, checking for crawling ticks before they attach can prevent disease transmission. Prompt removal of an attached tick reduces the risk of Lyme disease and other infections. Wearing Permethrin-treated clothing can kill or repel ticks on contact, providing an additional layer of defense.
Stationary vs. Moving
One of the simplest ways to check for a tick is to gently touch the dark spot. If it skitters away or shifts its legs, it is likely just crawling on the skin.
An attached tick stays firmly in place because its mouthparts are buried. For reliable pest control, always perform a touch test first.
Gently poke the spot with a finger or tool. If it moves quickly, you can brush it off without worry.
If it stays fixed and feels like a solid bump, it is already feeding. Look closely at the legs to confirm the attachment.
A crawling tick moves all of its legs when disturbed. An attached tick keeps most legs close to its body, though the legs may twitch.
Try to roll the speck with a fingernail. A loose speck rolls away easily, but an attached tick resists like a small, firm bump.
Time is also a helpful clue for tick identification. A flat tick might be crawling, while a plump, stationary bump means it has been feeding.
The key clue is resistance under gentle pressure. If it does not budge, it is likely embedded and requires removal.
Do not yank the tick off with your fingers. Use fine-tipped tweezers placed close to the skin for safe removal.
Visual Body Position
Looking at the tick’s body position is your best visual shortcut for tick identification. A feeding tick displays a distinct, fixed posture with its abdomen angled upward and legs tucked close.
The head is invisible since the embedded mouthparts anchor it under the skin like a tiny grappling hook. A crawling tick, however, is flat with legs spread and moving freely because it hasn’t committed.
Think of an attached tick as a stubborn, immobile bump you cannot flick off, similar to a bad decision at a barbecue. A crawling one is just a hitchhiker you can brush away.
The real clue for tick control is a stationary, rounded body stuck in place. Bottom line: if it does not move when you poke it gently, those mouthparts are already buried and removal requires fine tip tweezers that grab close to the skin to improve accuracy and prevent leaving mouthparts.
Tick vs. Mole vs. Scab: How to Tell Them Apart
Distinguishing a feeding tick from a mole or scab comes down to shape, legs, and texture. A tick looks like a tiny, dark sesame seed with distinct legs poking out.
A mole is flat or raised with no legs, while scabs are crusty and irregular. Scabs wipe away with dampness, but ticks don’t budge.
For real confidence in pest control identification, follow these four cues.
First, look for legs. Ticks have eight visible legs, but moles and scabs have zero.
Spotting those legs is your first win in tick detection. Second, check the shape.
Ticks are oval and symmetrical. Moles are round or irregular, and scabs are jagged.
This skin growth comparison saves confusion when performing a pest inspection.
Third, feel the texture. Ticks are hard and smooth. Scabs are rough and flaky.
A soft, fleshy bump is a mole. Fourth, try a gentle tug using proper tick removal methods.
A tick stays stuck, but a scab peels off easily.
Bottom line, if it has legs and won’t wipe off, remove it right away. For effective home pest control, use a tick removal tool to ensure safe extraction. Permethrin-based treatments on clothing can reduce tick bite risk by over 70 percent.
Why You Can’t Feel a Tick Bite Right Away
The tick’s secret weapon is its saliva, which contains natural anesthetics that numb the skin before it even starts feeding.
This clever chemical cocktail also includes anticoagulants to keep blood flowing and anti-inflammatory compounds to prevent swelling.
A mosquito bite might itch immediately, but a tick bite is silent with no pain or fuss.
You are left with just a tiny, numb spot.
This stealthy feeding strategy means ticks can go unnoticed for days in overgrown tick habitats like tall grass or wooded trails.
Personal protection is essential since you won’t feel the bite happening.
Wearing long sleeves and using EPA approved repellents can help you avoid tick bites during outdoor activities.
By the time you notice a bump, the tick may have been feeding for hours.
That is the tick’s dirty trick.
It hides its meal ticket, which is why professional tick control services are a smart choice for your yard.
Using a repellent with 98% DEET can provide up to 10 hours of protection against ticks.
How to Remove an Attached Tick Safely
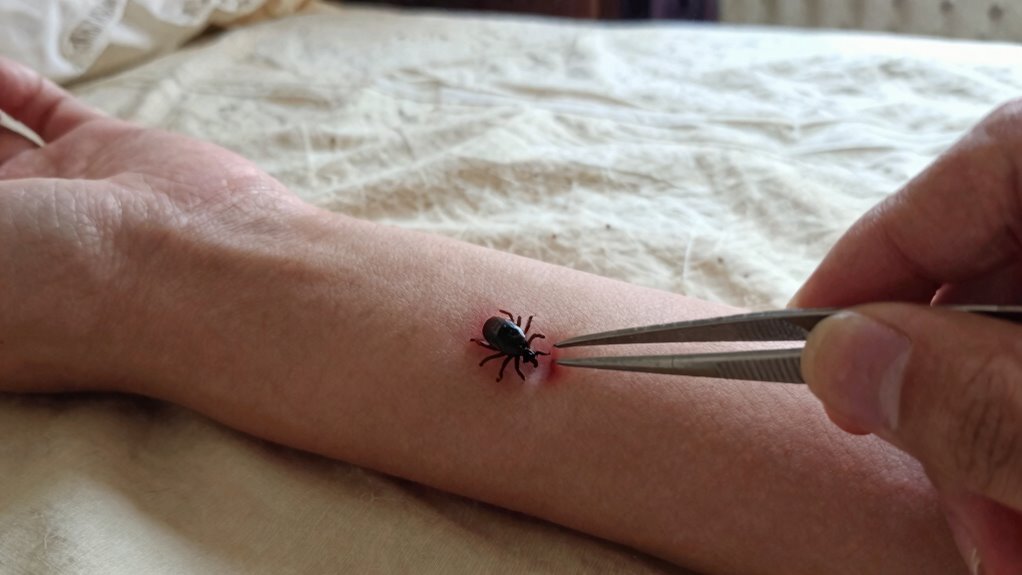
Removing a tick safely means using fine-tipped tweezers and nothing else. Avoid matches, petroleum jelly, or any home remedies that could cause the tick to regurgitate.
Grasp the tick as close to the skin as possible and pull upward with steady, even pressure. This helps prevent leaving mouthparts behind and reduces the risk of infection.
Clean the bite area with soap and water immediately after removal. For effective pest control around your home, check your yard and pets for ticks regularly.
Monitor the bite site for any rash or symptoms over the next month. If you notice a bullseye rash or fever, contact a professional pest control service for guidance. To further reduce future risk, consider a collar that kills ticks on contact and prevents new infestations by breaking the flea life cycle.
Safe Tick Removal Tools
Despite a tick bite being usually painless, finding a dark sesame seed sized bump that wasn’t there yesterday makes you want it gone fast. Safe tick removal starts with the right pest control tool, not panic.
Forget folk remedies like glue removal which can irritate and risk regurgitation. Proper gear prevents infection and keeps the process clean.
Fine point tweezers cost under 10 dollars and grip the tick’s mouthparts without squeezing its body. They are your first line of defense for quick tick removal.
Tick removal cards range from 10 to 15 dollars and slide under the tick like a credit card. They are simple and satisfying to use for pest control.
Tick keys cost 8 to 12 dollars and spin the tick out with a gentle twist. They are compact for hikers or dog walkers who need a portable solution.
Tick spoons cost 10 to 20 dollars and combine a magnifying lens with a slotted scoop. They give you visibility and leverage for effective removal.
Bottom line: invest 10 dollars in tweezers or a card for no drama results. These tick removal tools work without the mess. After removal, consider treating your clothing and gear with Permethrin sprays to provide lasting protection against future tick bites.
Precise Grip Technique
Before grabbing the nearest pair of pliers, please don’t, a precise grip technique is what separates a clean removal from a messy disaster. Use fine‑tipped tweezers, grasping the tick as close to the skin’s surface as possible.
Avoid squeezing the body, as that risks injecting more saliva into the skin. Apply steady pressure upward, never jerking or crushing the tick.
Then add a gentle twisting motion, either clockwise or counter‑clockwise, to help the mouthparts release. This isn’t a race; a slow, firm pull with that twist is your best bet for effective pest control.
Don’t worry if it feels stubborn. Steady pressure prevents leaving the head behind.
The goal is one smooth, controlled motion. Done right, you’ll remove the whole tick without drama.
That’s the precise grip technique: no pliers, no panic, just a calm, confident extraction. For your next infestation prevention check, this method ensures you handle the problem safely and stress‑free. Using permethrin-treated clothing adds a second layer of protection by killing ticks on contact before they can attach.
Post-Removal Site Care
After the tick is gone, your job isn’t quite finished. The bite site needs a little TLC.
Clean it with soap and water, then apply an antiseptic to prevent a wound infection. Watch for redness or swelling over the next few weeks.
Spot a bullseye rash. That red ring around the bite means Lyme disease may be lurking.
Feel feverish or achy. Flu-like symptoms within 30 days signal trouble.
See pus or spreading redness. These scream infection, not just irritation.
Find leftover mouthparts. They can cause a nasty, lingering infection.
Oral antibiotics are your best friend if any red flags appear. Don’t wait around hoping it’ll heal on its own.
Most bites heal fine, but staying alert beats regret. Keep calm, keep cleaning, and call a pest control professional if something feels off.
A local exterminator can also help with ongoing tick prevention around your property. Use a 70% isopropyl alcohol solution for safe, effective disinfection of the bite site and any tools.
What Happens to a Tick’s Body as It Feeds
As a tick feeds, its body transforms from a flat poppy seed into a grayish blue marble over several days. This engorgement happens because the cuticle stretches to accommodate a growing blood meal.
Feeding duration directly controls how large the tick becomes, with full size reached after 3 to 7 days. Disease transmission risk spikes after 24 to 36 hours of attachment, as pathogens move from the tick’s gut into its saliva.
| Stage | Size | Disease Transmission Risk |
|---|---|---|
| 0–24 hours | Flat, 1–3 mm | Very low |
| 24–36 hours | Slight bulge, 2–4 mm | Low, begins |
| 36–48 hours | Rounding, 4–6 mm | Moderate |
| 2–3 days | Engorging, 6–8 mm | High |
| 3–7+ days | Fully engorged, 8–10 mm | Very high |
The tick’s legs stay splayed outward, and its mouthparts remain buried in the skin. It is basically a tiny parasitic water balloon, famously rude but biologically clever.
To prevent tick bites on your property, focus on professional pest control treatments for your yard. These treatments target high risk areas like tall grass and leaf piles where ticks wait for hosts. Natural & eco-friendly granules can be sprinkled around gardens and perimeters for a non-toxic barrier.
Reduce tick habitats by keeping your lawn mowed short and creating a barrier of wood chips between woods and your home. Consider a scheduled tick control service to break the feeding cycle and lower disease transmission risk for your family.
Check yourself and pets for ticks daily, especially after spending time outdoors. Prompt removal within the first 24 hours greatly reduces the chance of Lyme disease or other tick borne illnesses.
How Long Before a Tick Bite Becomes Dangerous?
A tick bite does not become dangerous immediately. The threat begins after the tick has been attached for a specific window of time.
The real risk is disease incubation, when bacteria or viruses move from the tick’s gut into the host. This transmission risk spikes sharply after 24 to 36 hours of attachment, making prompt removal essential.
During the first 24 hours, the transmission risk is low. The tick is usually still flat and barely noticeable.
Between 24 and 48 hours, the danger zone begins. Disease incubation starts as the tick’s saliva delivers pathogens.
Beyond 48 hours, the transmission risk is high. Lyme disease, for example, often requires this window to infect.
Over 72 hours, the danger is at its maximum. The tick is fully engorged, and transmission risk is nearly certain if the tick was carrying something.
The bottom line is to check yourself daily. That poppy-seed-sized hitchhiker is a ticking clock, so consider professional pest control for your yard to reduce tick habitats using a permethrin concentrate mixed with water for long-lasting residual action.
If you suspect a tick has been attached for more than 24 hours, consult a doctor about preventive treatment. Quick removal and proper disposal are your best defense against tick-borne illness.
When Size and Color Signal an Attached Tick
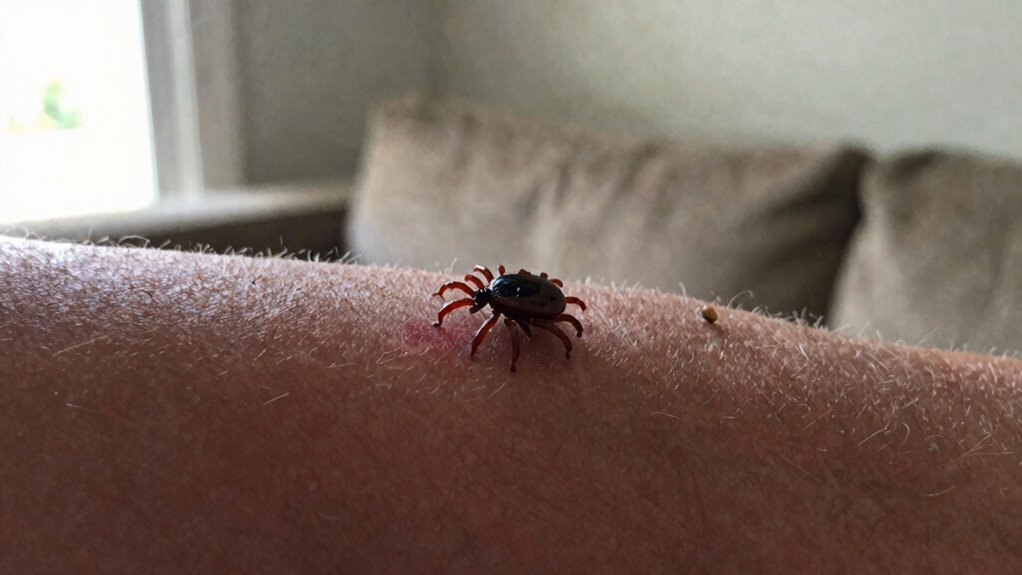
You can spot a tick by its size and color before you even feel it. That is because tick saliva numbs the skin, so the bite stays painless for hours.
An attached tick looks like a small, dark bump, about 1–2 mm for nymphs or 3–5 mm for adults. You can see its legs poking out from the skin.
If it has been feeding for days, it swells and turns grayish or greenish-blue. This color change is a dead giveaway for homeowners looking for pest control solutions.
A tick can stay attached for up to a week, growing bigger and rounder. An engorged tick can balloon to ten times its original size, so early removal is key for effective tick control.
Check for a dark, fixed speck that does not wipe away. If it is there, it is not a mole, and you should call a pest control professional for inspection and treatment. Reapplication is needed after heavy rain or one month to maintain an effective barrier.
What to Look for Around the Bite Site After Removal
After the tick is gone, the real detective work begins. Look for these four signs for proper bite care and scar prevention.
A tiny depressed crater marks where the mouthparts were, like a miniature pothole on your skin. Redness or mild swelling appears as a small angry halo that usually fades in a few days.
Check for any leftover black specks, these are retained mouthparts that act like tiny splinters causing irritation. Feel for firmness or a hard lump, your immune system’s security guard responding to tick saliva.
Clean the area with soap and water daily, then apply antibiotic ointment. Keep it damp with petroleum jelly, this reduces scarring and speeds healing. For added relief from itching or swelling, hydrocortisone 1% fights inflammation from the bite.
If redness expands beyond a quarter-sized circle, see a doctor. For effective pest control solutions, consider professional yard treatments to prevent future tick encounters.
How to Spot the Bullseye Rash After a Tick Bite
The bullseye rash, called erythema migrans, appears in about 70 to 80 percent of people infected with Lyme disease.
It shows up 3 to 30 days after a tick bite, beginning as a small red spot that expands into a round or oval target shape with a clear center.
Watch for that classic ring within a ring appearance.
The rash is not usually itchy or painful, which makes it easy to overlook if you are not checking for it.
If you spot this rash, contact a healthcare provider immediately for diagnosis and treatment.
Professional pest control can help reduce tick populations around your home and yard.
Using tick repellents and wearing protective clothing are smart prevention steps.
Treating your property for ticks is a wise investment in your family’s health.
Because the rash often goes unnoticed, relying on up to 12 hours of protection from a 20% Picaridin repellent can be a critical part of your prevention strategy.
Identifying Erythema Migrans
The bullseye rash, medically known as erythema migrans, is the most recognizable sign of Lyme disease. It is about as subtle as a neon sign in a library, so spotting it early matters for pest control safety.
This rash signals the Lyme bacteria has spread from the bite site, often appearing days after a tick detaches. Its classic bullseye pattern, a red ring around a clear center, is a dead giveaway, but it is not always textbook perfect.
The rash feels warm, not painful, and that creeping heat should unsettle you. It expands slowly over days, acting like a silent alarm clock for tick-borne disease.
It can trigger fatigue, fever, or chills, reminding you that a feeding duration may have passed 36 hours. Improper removal complications, like leaving mouthparts, do not cause this rash; the infection itself is the culprit.
Bottom line: if you spot this rash after a tick bite, see a doctor fast. For prevention, use tick repellents and perform thorough yard treatments to reduce exposure.
Rash Timing and Progression
Check daily for 30 days after any tick exposure. No rash does not mean you are safe. Other symptoms like fever or fatigue matter just as much. Professional pest control around your yard can reduce tick encounters significantly. If you suspect a bite, request a free inspection for tick habitats near your home. When in doubt, see a doctor quickly. Ticks don’t send RSVPs, so stay alert. Watch for erythema migrans spreading outward from the bite site. Buy tick repellent for high-risk outdoor activities. For reliable defense against ticks carrying Lyme disease, apply a DEET-based spray evenly to exposed skin and clothing before heading outdoors.
Frequently Asked Questions
Can a Tick Be Attached Without Breaking the Skin?
Yes, tick anatomy shows mouthparts create a tiny break in skin for feeding. Feeding duration starts immediately after attachment, though the initial wound is so small it may not be visible.
The tick’s mouthparts pierce the surface. This is necessary for blood extraction. If you suspect a tick, look for its body on the skin, not for a dramatic wound.
Even tiny nymphs must breach the skin to attach. That’s why professional pest control services often stress checking for ticks promptly after outdoor activities. For effective tick prevention, consider using trusted repellents and yard treatments.
Buying the right tick remover tool can help you safely detach any tick you find. Always inspect your gear and clothing after hiking or gardening to reduce infestation risks.
Do Attached Ticks Move if You Blow on Them?
No, an attached tick stays put when you blow on it. Its mouthparts are firmly embedded, and the body feels fixed, not loose.
Unlike some tick types that twitch legs when disturbed, a feeding tick won’t relocate. This immobility is actually a good thing during tick removal. If it moves, it was never fully attached in the first place.
Think of it as nature’s stubborn hitchhiker. Once locked in, wind won’t budge it, so don’t rely on blowing to remove a tick.
For safe removal, you need a quality tick removal tool instead of folk remedies. Use a fine tipped tweezer or a tick key designed for pest control.
These products help you grip the head without squeezing the body. This prevents disease transmission, which is a top concern for homeowners.
Look for tick removal kits that include a magnifier and antiseptic. Many pest control companies recommend carrying one during hikes or yard work.
If you want professional grade results, invest in a tick twister or a similar device. It’s a smart purchase for anyone living in high tick areas.
After removal, save the tick in a sealed bag for identification. Then call a local pest control expert for yard treatment options to reduce future risks.
Can a Tick Attach Inside a Body Orifice Like the Ear?
Yes, a tick can attach inside a body orifice like the ear. Ticks are opportunistic parasites that seek thin skin, warmth, and darkness, making the ear canal a hidden haven for infestation.
Contrary to myths, ticks do not crawl in via bites; they simply wander in from your hair or clothing. Once lodged, removing a tick from the ear canal becomes tricky and risky for DIY pest control.
Using tweezers can push the tick deeper or cause injury, so a specialized tick removal tool or professional medical help is safer. Engorged ticks may swell, leading to muffled hearing, pain, or infection if not handled with proper pest prevention methods.
For effective pest control after hikes, always conduct a full body check including inside the ears. If you find a tick, consider a ready to use tick removal kit from a trusted pest control brand.
Bottom line: inspect thoroughly or risk an unwelcome, six legged squatter. For peace of mind, shop for professional grade tick control products designed for safe at home use.
Is It Possible for More Than One Tick to Attach at Once?
Yes, absolutely. Tick clusters are common in infested areas, so multiple ticks can attach during a single outing.
Bite timing varies, with each tick independently deciding when to feed. An engorged tick grows grayish blue after days, while others remain small.
This means one host can sport a mixed age group. In high risk zones, expect up to a dozen ticks at once.
If you find one attached, inspect thoroughly for less obvious others hiding in skin creases. Location matters, so prioritize yard tick control around tall grass and woodpiles.
For effective pest management, use a quality tick repellent spray on clothing and gear. Professional tick prevention treatments can reduce yard infestations by up to 90%.
Check pets and family members promptly after outdoor activities. Buying a reliable tick removal tool ensures safe extraction without leaving mouthparts behind.
No, a single tick bite cannot always predict disease risk, but quick removal lowers it. For complete protection, combine landscape barrier sprays with personal tick checks after every walk.
How Can You Tell if the Head Is Still in the Skin After Removal?
After removal, look for a small, dark dot at the bite site. That dot is likely the tick’s head still embedded.
Head removal isn’t always clean, and leftover mouthparts can look like a tiny splinter or black speck.
If the bite area stays red, swollen, or develops a hard lump for days, the head is probably still in there.
Failed tick removal with tweezers is common. It’s annoying but not usually dangerous.
Your skin will push the remaining parts out eventually, much like a stubborn wood chip.
For effective tick control, always use a quality tick removal tool to avoid leaving the head behind.


