
Seeing carpenter ants in or around your tree can be worrying, but here’s the key: they are a sign of a bigger problem—decay. Unlike termites, these ants don’t eat wood; they carve out nests in wood that’s already soft from moisture.
To truly get rid of them, you must fix the moisture issue first. Check for dark, wet bark, crumbling wood, or fungi like mushrooms. Once the rot is gone, the ants will usually leave on their own. If you need direct action, pour a water-based liquid insecticide slowly into the nest hole, then seal it—skip surface sprays, as they won’t reach the colony. Keep reading for step-by-step solutions and a roundup of the best products to use.
At A Glance
- Look for sawdust piles at the base and follow ant trails 15 minutes after sundown.
- Treat active nests directly by pouring water-based insecticide into the main entrance hole.
- Drill a ¼-inch upward hole into the nest area to flood hidden galleries with insecticide.
- Fix moisture problems like decay and rot first; ants are a symptom, not the cause.
- Seal entry holes with caulk or putty only after confirming the colony is dead.
How to Identify Carpenter Ants vs. Termites or Moisture Ants
Three key differences separate carpenter ants from termites or dampness ants. First, wing color: carpenter ant swarmers boast dark, smoky wings, whereas termites flash pale, translucent ones.
Three key differences separate carpenter ants from termites: wing color and body shape.
That’s a dead giveaway if you find a pile near a window. Second, body shape: carpenter ants have pinched waists and bent antennae, while termites look almost rectangular.
Third, indoor nests: carpenter ants, unlike moisture ants, often set up satellite colonies inside dry, sound wood. They trail from trees to your eaves, which is a common sign for pest control inspections.
Termites actually eat wood; carpenter ants just excavate it for galleries. You’ll often spot fine sawdust beneath their tunnels, a key clue for identifying the infestation type.
If you see winged insects indoors, don’t panic. Check those wings and waists first to avoid an unnecessary termite treatment call.
That quick check saves a phone call, and maybe your sanity. For reliable identification, look for dark wings and a pinched waist, or call a local exterminator if you need a professional pest inspection.
Do You Actually Need to Get Rid of Carpenter Ants in That Tree?
You spotted carpenter ants crawling up a tree and saw sawdust at the base. You are probably wondering if you need to call in a pest control company for an emergency treatment.
The honest answer is probably not. These ants are more symptom than cause, like a fever telling you something else is wrong.
Carpenter ants do not eat the wood like termites do. They simply excavate dead tissue for nests as part of normal carpenter ant ecology.
The ants signal decay, not doom for the tree. Ants move into wood already softened by rot, often from high soil dampness levels around the roots.
Healthy trees handle these ants just fine. The ants only tunnel in dead heartwood, leaving the living layers untouched.
Treating the ants with insecticides rarely helps the tree. You would just kill the ants, but the rot and moisture problem remain.
Focus on moisture control rather than ant removal. Except if ants are marching indoors, leave them be and fix the water issue.
If ants do become a problem indoors, delayed-action formulas are effective for colony-wide elimination, including queen targeting.
Why Rot Attracts Carpenter Ants: and How to Spot It
Carpenter ants do not eat wood. They simply carve out cozy homes in trees that are already soft and rotting from dampness.
To spot trouble, check for sawdust piles at the base of the tree. That sawdust is their excavation debris.
Grab a flashlight 15 to 20 minutes after sundown. Watch for ants marching up and down the trunk.
Those two signs, sawdust and nighttime ant traffic, point straight to rot and a nest inside.
Early detection is key for effective pest control. Addressing moisture issues can prevent carpenter ant infestations from growing. For ongoing protection, residual barrier sprays can repel ants for up to 12 months on non-porous surfaces.
If you notice these warning signs, it may be time to call a professional exterminator. They can perform a thorough inspection and treat the affected tree.
Moisture & Decay Signals
Since carpenter ants are not the cause of tree rot, they are just the cleanup crew. It pays to know what actually draws them in for a pest control inspection.
Dampness sources from a cracked limb to a poorly draining crotch invite fungal decay. This softens wood into perfect nesting material for ant colonies.
Ants do not eat timber, they excavate the spongy aftermath. This leaves you with a tree that is structurally sketchy and in need of professional treatment.
Spotting the signals early saves a headache and a costly removal bill. A few clues stand out for homeowners seeking effective ant management.
Dark, wet patches on bark appear near old wounds or pruning cuts. Soft, crumbling wood flakes off when you poke it with a screwdriver.
A musty, earthy smell around the trunk base is a fungus’s calling card. Mushrooms or conks sprouting from the bark are a guaranteed decay billboard.
No rot means no ants, so fix the damp to eliminate the attractant. Once you address moisture issues, they will find another gig elsewhere.
Spotting Sawdust Piles
A pile of sawdust at the base of a tree is not a woodpecker’s leftovers. It’s a calling card for carpenter ants, often mixed with dead ant bits that signal active excavation in decayed wood.
These ants don’t eat wood; they chew galleries through rotting, moisture‑logged timber, leaving that coarse, pencil‑shaving debris behind. Their nocturnal habits mean you’ll rarely see them working, but the fresh sawdust tells the story clearly.
Check under the pile for freshness, lightness, and crumbly texture, which points to a nest above. If you need carpenter ant control, this discovery is your first red flag that moisture damage is present.
The colony thrives in dead tissue, not healthy wood, so spotting sawdust means rot already rules the structure. For effective pest control services, investigate the area promptly to prevent structural pest damage.
See the pile, suspect decay, and call a professional for a home inspection if you notice recurring debris. Addressing the moisture source is key to stopping carpenter ant infestations before they spread, and applying plant-based sprays along the base can provide immediate contact kill and a long-lasting repellent effect.
A proactive approach saves you from costly repairs, and hiring a local exterminator can confirm the nest location. This is a clear sign that wood decay treatment should be your next step.
Nighttime Ant Activity
Watching ants at night is like a real time detective show. Just grab a flashlight and head out 15 to 20 minutes after sundown.
Carpenter ants are nocturnal foragers, so that is when you will catch them red handed. Look for these four clues for effective pest control.
Glowing trails from a flashlight beam reveal ant convoys. Daytime trails vanish in the sun glare.
Sawdust piles of fresh coarse bits at the tree’s base signal active digging. Ant excrement appears as dark damp specks near entry holes.
These specks confirm the ants are nesting inside the wood. Tap the trunk and listen for rustling sounds or faint crinkling from galleries.
Rot attracts carpenter ants because it is soft, easy to chew, and moisture stable. Remember that ants are symptoms of rot, not the cause.
Spotting night activity means the rot is real and needs attention. Fix the moisture problem and the ants will move out on their own.
Find the Nest: Follow Ant Trails and Sawdust Piles
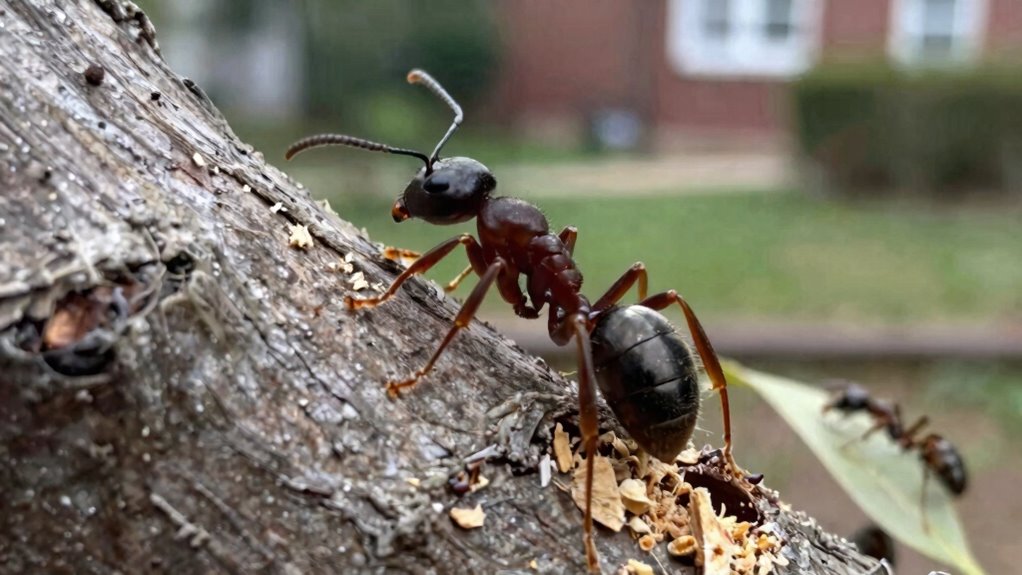
Following ant trails is like using a flashlight to track worker ants at dusk as they return to their colony.
Sawdust piles at the tree base, often with ant body parts mixed in, mark the nest entrance like a tiny crime scene.
Once you spot these clues, the nest is usually right above in the rotten wood.
You can then decide on the best carpenter ant control method for your home.
If you need to eliminate the infestation, a targeted pest treatment at the nest is most effective, using slow-acting poison to ensure worker ants carry bait back to the colony.
This practical approach helps you stop the ants before they cause more structural damage.
Trail-Following Technique
The simplest way to find a carpenter ant nest is to follow the ants themselves. These pests leave clear trails at dusk, so grab a flashlight and watch their path for 15 minutes.
They move from foraging sites back to the nest, often near entry points caused by tree injuries. Track their line by looking for ants marching in a steady column up the trunk, especially after sundown.
Inspect sawdust piles at the base, which signal active galleries above. Check tree wounds like cuts from lawn mowers or pruning that expose wood and invite moisture issues ants love.
Listen for rustling, a faint scratching sound from inside means you’ve found the nest. Follow the trail quietly, and you’ll locate the source without guesswork. Once you find the nest, applying a crack-and-crevice accuracy spray like TERRO Carpenter Ant and Termite Killer can target the colony directly with long-lasting effects.
Sawdust Debris Inspection
Trail-following gets you close, but sawdust piles are the real giveaway.
For proper sawdust identification, look for coarse, wood-colored bits mixed with dead ant parts or insect legs. This is not termite frass, which is finer and powdery.
Debris location is key for effective carpenter ant control. Check the base of the tree, inside cracks in the bark, or around broken branches.
A flashlight after dark helps spot fresh piles, since ants are active at night.
One reader found a mound under an oak that looked like spilled coffee grounds. That is a carpenter ant nest.
If you see sawdust, you are near the nest and need to plan your removal strategy.
Don’t just sweep it away. Mark the spot and plan treatment.
It is like finding key evidence at a crime scene. The suspect is chewing dead wood, not your wallet.
For persistent infestations, applying a Fipronil roach gel in nearby cracks may help eliminate any ants that trail from the tree toward your home.
Step 1: Safely Pour Liquid Insecticide Into Carpenter Ant Nests

Once you’ve located a carpenter ant nest in a tree, the most direct tactic is to pour a water-based liquid insecticide directly into it. Nest detection is half the battle; ant elimination hinges on saturating those galleries where the colony hides.
For best results, choose a product labeled for carpenter ants and mix it per instructions. Use a sprayer or watering can to pour the solution slowly, avoiding splashback.
> For best results, choose a product labeled for carpenter ants and mix per instructions. Pour slowly with a sprayer or watering can.
Target the main entrance hole, then move to secondary openings if visible. Pour a full gallon or more, letting it soak deep into the wood.
Wait 24 hours and check for activity; reapply if ants remain. This works best on accessible treeholes.
It’s messy, but effective, so just don’t wear your favorite shoes. Direct saturation gets the job done, and for deeper infestations, consider a foam insecticide that expands into hidden galleries.
For persistent colonies, combine this with baiting around the tree base to target foraging workers. Always read the label for safety and reapplication intervals.
A garden sprayer with a narrow nozzle helps you direct the flow precisely. You’ll find that a full gallon per nest is usually needed to drown the brood.
If you notice sawdust or moisture near the entry, that’s a strong sign of an active carpenter ant nest. After treatment, seal the entrance with caulk to prevent future entry, but only after you’re sure the colony is dead.
Pairing bifenthrin spray with an insect growth regulator can break the pest life cycle and improve long-term control.
Step 2: How to Drill and Treat a Hard-to-Reach Carpenter Ant Nest
Not every nest sits conveniently open to the sky. Sometimes those little architects pick a spot deep inside a branch, hidden by tree decay and moisture entry.
First, locate the nest by listening for rustling or spotting sawdust piles. Then, drill a ¼-inch hole into the suspected area, angling upward slightly.
Don’t go too deep. Just enough to hit the gallery.
Use a cordless drill with a long bit. Insert a straw or funnel tip into the hole.
Pour in a water-based liquid insecticide slowly, about half a gallon per nest. The liquid floods the galleries, drowning the colony.
Let it soak in completely. Seal the hole with putty afterward.
This method works like a charm on those stubborn carpenter ant nests hiding in plain sight. For hard-to-reach infestations, this treatment stops the colony fast. However, for ongoing control, you can also use boric acid powder as a stomach poison that ants transport back to the nest, disrupting their colony.
Step 3: When to Use Insecticidal Dust Instead of Liquid
When a nest is hidden deep in dead wood and liquid sprays can’t reach it, insecticidal dust is the smarter solution.
Drilling a small access hole into the nest chamber and puffing in dust ensures every gallery gets coated, even in dry conditions where liquid would simply drain away.
This method works perfectly for treating high-up treeholes or stumps, giving you a precise, long-lasting treatment without soaking the trunk.
For stubborn carpenter ant or wasp infestations, dust offers superior penetration and residual control that liquids often miss.
Use a hand duster or puff applicator to inject the powder directly into the cavity, which maximizes contact with the colony’s breeding zone.
This targeted approach reduces repeat treatments and helps you eliminate the entire nest in one visit.
If you’re dealing with a hidden nest behind walls or under siding, dust also outperforms liquid because it won’t drip or stain surrounding surfaces.
Just remember to seal the entry hole after application to keep the dust active and protect beneficial insects from wandering inside.
Drilling Access Points
The choice between insecticidal dust and liquid depends on whether the nest is dry and accessible or wet and risky.
Drilling access points changes the game entirely when you need to bypass wet wood, tricky branches, or deep galleries that liquid can’t reach.
Shotgun treatments become practical with dust blown into multiple drilled holes, covering a nest faster than any liquid stream.
Bait placement pairs well with dust because dry powder stays put, whereas liquid would just wash away in damp conditions.
Dust won’t soak into rot or drip out of holes, making it ideal for overhead nests where liquid would rain down on you.
Drilling a ¼-inch hole at a slight upward angle lets you puff dust into hidden chambers without flooding the tree.
For dry nests, dust is the smarter play with no mess and no waste, just a clean shot at the colony.
This technique works great for hard-to-reach ant colonies and hidden wasp nests in structural voids.
Waterproof deltamethrin dusts work well in wet conditions, ensuring the insecticide stays active despite rain or humidity.
Dusting Dry Nest Chambers
When a carpenter ant nest is dry and in solid, non rotting wood, insecticidal dust is the best choice. Liquid would just run out or soak away without effect.
For the proper dusting technique, puff dust directly into the nest chamber access holes you drilled earlier. A quarter inch hole is plenty for this job.
Use a hand duster like the B&G Bulb Duster, which costs around $15. Shoot a few puffs of Drione or Delta Dust into the openings.
Do not overapply the dust. The ants will track it through the galleries on their bodies and spread it to kill the colony slowly.
A dry nest means no dampness to clump the dust. This keeps the product effective for months after application.
The bottom line is simple. Use dust when the nest is dry and liquid when it is damp.
For reduced hand fatigue during larger applications, consider a manual push-pull air pump duster instead of a squeeze bulb.
Treat Tree Trunks to Stop Carpenter Ants From Climbing
Treating the trunk is a straightforward way to stop carpenter ants from climbing your trees. This method blocks the constant stream of foragers headed to the canopy.
A trunk drench applied with a pump sprayer coats the bark with a residual insecticide. Ants must cross this treated area, effectively shutting down their highway. For a physical barrier, the banding technique wraps a sticky trap around the base. This traps ants mid climb, keeping them away from the foliage.
Here is what a proper trunk treatment involves. Choose a permethrin based liquid costing roughly thirty dollars per gallon and mix it per label instructions. Higher percentages require careful mixing to avoid ineffective pest control or increased toxicity.
Spray from ground level up to four feet high, soaking all bark crevices. Reapply after heavy rain, as moisture washes away the chemical.
Inspect weekly for fresh trails and repeat treatment as needed. This approach won’t kill the nest, but it keeps ants from invading your space.
Create a Perimeter Barrier Around Your Home
Creating a perimeter barrier around your home is one of the most effective ways to keep carpenter ants from marching indoors.
This simple idea makes the outside less inviting so they never bother checking your foundation.
Start by sealing every crack and gap with exclusion caulk, paying special attention to utility lines and window frames.
This stops them from squeezing through tiny openings and prevents carpenter ant infestations before they start.
Ant mounds near your foundation are a red flag for soil activity.
These often house garden ants, not carpenter ants, but they still signal trails that can lead toward your walls.
Treat the soil with a residual insecticide, creating a 5‑foot wide band to stop ant invasions.
Reapply after heavy rain to maintain your home barrier.
It is not glamorous work, but the payoff is real for pest control.
A solid barrier costs under $30 and an afternoon of effort.
Do it once, check twice a year for cracks or new trails, and you are mostly done.
The bottom line is barrier first, baits later, so do not wait for marching lines to appear.
For longer-lasting protection, consider using Control Solutions Bifen LP granules, which remain effective for up to 90 days.
How to Use Baits to Control Carpenter Ants Safely
Patience is a virtue when using baits for carpenter ant control. These slow-acting poisons let ants carry the bait back to the colony, wiping it out from within.
For safe and effective use, remember these key points. Place baits near ant trails, not on the nest itself, to let workers locate and transport the poison naturally.
Use gel bait in tree crevices. Squeeze a pea-sized dab into sawdust piles or bark cracks where ants forage.
Follow bait placement strategies by setting stations at tree bases and along trunks. Space them 10 feet apart for maximum coverage.
Keep baits dry and shaded. Rain or direct sun makes them spoil faster than leftovers in a forgotten fridge.
Apply baits in early evening when ants are most active. Resist the urge to check progress daily.
A week of patience usually solves the problem, no chemical suit required. Bait stations with sticky strips placed under cabinets offer secure placement that prevents pet access while attracting foraging ants. This targeted approach ensures your carpenter ant control is both safe and complete.
Prune Dead Limbs and Seal Wounds to Prevent Return Nests
Prune dead limbs and seal wounds to stop pests from returning.
Humans who try using bait while ignoring the tree’s actual damage are like putting a bandage on a leaky pipe. It helps for a moment, but the problem comes back.
Dead branches and open cuts invite dampness, rot, and wood-boring insects. Cut every dead branch back to the collar where it meets the trunk.
Skip sealing fresh cuts. Wound dressings trap moisture and make things worse. Let the tree heal naturally instead. Proper seal kits block beetles, ants, spiders, dust, wind, and rain through gaps, but unlike tree wounds, they are designed for doors and windows where sealing is beneficial.
This prevents structural decay and keeps the tree stable and healthy. Tree preservation means removing the rot, not covering it up.
For a mature oak, trimming a six-inch branch costs between $50 and $100. Ignoring it can lead to a costly pest nest or tree failure.
Bottom line: snip the dead stuff, leave cuts open, and watch ants stay gone for good.
3 Signs You Need a Pro for Hidden Carpenter Ant Infestations
Unless the nest is in plain view with ants marching like they own the place, carpenter ant infestations often stay hidden for years. When hidden nests evade your flashlight and sawdust piles never appear, structural damage may already be underway.
A pro becomes necessary when you hear rustling within walls or high in tree trunks at night. That is ant activity, not ghosts.
Vigorous tree shaking produces no ant response, confirming the nest is deep inside decay. Multiple trees show ant trails, but no nest is found; they are always foraging from a hidden hub.
You have tried perimeter sprays twice with zero results. Hidden nests laugh at surface treatments.
The bottom line is if you cannot find the source after two solid tries, the problem is bigger than your flashlight. A professional carpenter ant exterminator costs $200 to $400 but saves you from rotting trees falling on your shed.
Don’t guess. Call someone who hears rustling for a living.
Frequently Asked Questions
Can Carpenter Ants Kill a Healthy Tree?
No, carpenter ants cannot kill a healthy tree. They only tunnel in already rotting wood, feasting on other insects, not the tree itself.
A large ant colony size indicates pre existing decay, not a direct threat. A tree’s stress response is to decay from dampness, not ant activity.
Think of them as nature’s cleanup crew, lazy roommates, not demolition experts. Spot them? Inspect for rot, not panic.
Bottom line: treat dampness, not ants, for tree health. If you see carpenter ants, call a pest control expert for a professional inspection.
For effective pest management, focus on moisture control products and wood treatment solutions. Your local tree care or pest control company can recommend the best ant bait and moisture barrier options.
Do Carpenter Ants Bite or Sting Humans?
Yes, carpenter do bite humans, but it feels more like a pinch than a true bite.
They also spray formic acid from their abdomen into the wound, causing a sharp, burning sensation.
This ant venom creates a low level of pain, nothing like a bee sting, and it’s rarely serious, just annoying.
Think of it as their way of saying “back off, buddy” with a little chemical oomph.
While a bite is unpleasant, it’s not a reason to panic.
Instead, focus on treating the nest to stop the problem at the source.
If you have a carpenter ant infestation, you need professional pest control products that target the colony.
Look for bait stations, liquid concentrates, or dust treatments specifically designed for wood damaging ants.
Knowing the difference between a bite and a sting helps you choose the right treatment.
For lasting relief, apply a non repellent insecticide around the nest and use a foam spray for deep wall voids.
Buying a complete carpenter ant control kit saves you time and ensures you have the right tools.
Most homeowners see results within a few days when they combine baits with perimeter sprays.
Don’t let a few pinches scare you.
Take action now to protect your home from structural damage.
Will Carpenter Ants Spread From a Tree to My House?
Yes, carpenter ants in a tree can spread to your house, but only if your home already has moisture-damaged wood for them to nest in.
They aren’t after your dry two-by-fours; they want rotten, damp wood instead.
Winged swarmers from the tree may land on your siding, signaling a nearby colony, but actual structural damage requires existing decay.
So fix leaky gutters and rotting fascia, and you’ll likely avoid an indoor ant invasion entirely.
For carpenter ant control, start by eliminating moisture sources and replacing water-damaged lumber.
Then apply a targeted insecticide around your foundation and any tree stumps or firewood piles near your home.
What Time of Year Are Carpenter Ants Most Active?
Carpenter ants are most active in spring and early summer, when their swarming peaks. On warm, humid evenings, winged reproductives emerge looking to start new colonies.
Don’t let that fool you, though. Their real work, the seasonal foraging cycles, happens all summer long.
Workers tirelessly hunt for food from dusk till dawn. They’re not picky about the season, just about finding a safe, soggy dead limb.
The bottom line is this: spring is for mating, but summer is for feeding. If you spot swarmers inside your home, it’s time to call a pest control professional for an inspection.
You need to eliminate moisture sources and seal entry points to prevent an infestation. For active colonies, a targeted carpenter ant bait or foam treatment is your best bet for fast results.
Keep an eye on damp wood around windows, eaves, and porches. That’s where these destructive pests love to nest and expand.
Are There Natural Ways to Repel Carpenter Ants From Trees?
Yes, natural repellents can help, but they work more like a gentle suggestion than a magic spell. For carpenter ant control on trees, citrus sprays made from orange or lemon oil disrupt ant trails effectively.
Spray the tree trunk every few weeks to keep ants away, but avoid applying in heavy rain. Diatomaceous earth, a fine powder of fossilized algae, dehydrates ants on contact and costs under $10.
Puff it into holes or sprinkle it around the base of the tree for best results. This is not a miracle cure, but for mild infestations, it is a solid, low toxicity first step.
If you want a natural ant repellent that works without harsh chemicals, diatomaceous earth is a smart purchase. For heavier carpenter ant problems, you may need to upgrade to a targeted insecticide bait or call a professional.


