
Removing a wasp nest safely starts with knowing exactly what you’re dealing with—papery gray nests, not waxy beehives, and timing matters. Treat at dusk when wasps are sluggish, and always gear up in light colors with taped cuffs and a basic protective suit.
For ground nests, a puff of insecticidal dust into the opening works best, while exposed nests need a 20-foot aerosol spray. Never block the entrance, and retreat at least 30 feet after treating.
This guide walks through every step, from identifying the nest type to cleaning up afterward without getting stung. Stick around for the full breakdown so you can handle the job with confidence and minimal risk.
At A Glance
- Treat nests at dusk or dawn when wasps are sluggish and less aggressive.
- Wear light-colored, full-coverage clothing with gloves, veil, and sealed cuffs.
- Use insecticidal dust for ground nests; aerosol spray for exposed hanging nests.
- Never block the entrance until wasp activity stops for a full week.
- Call a professional if allergic or if the nest is inside walls or eaves.
How to Identify a Wasp Nest (And Confirm It’s Not a Bee Nest)
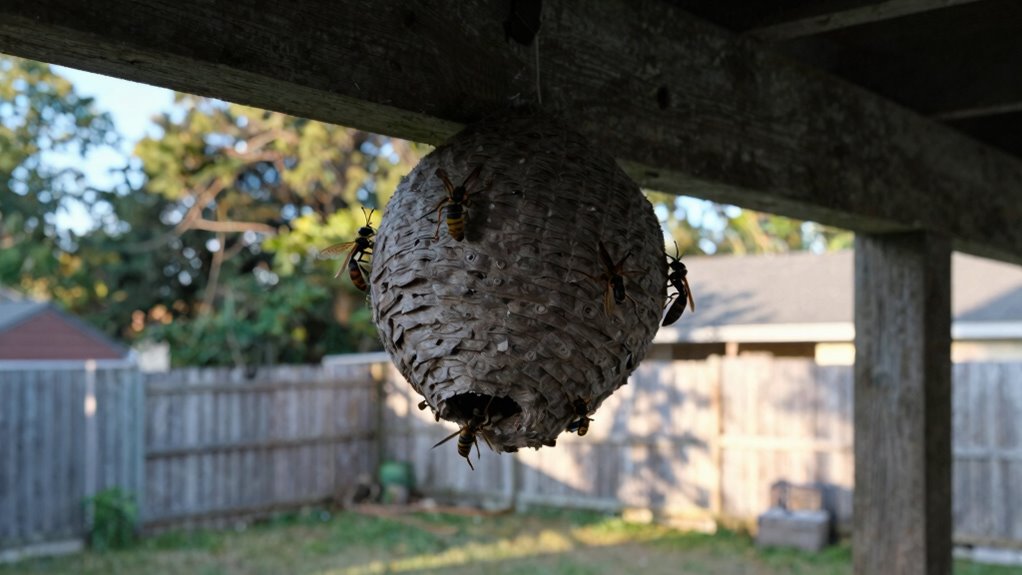
Before you declare war on a nest, make absolutely certain you’re not about to massacre a bee colony. Nest identification is essential for bee conservation and safe pest control.
Wasp nests are papery, gray, and football-shaped, often hanging from eaves or hidden in ground holes. Honey bees build waxy, golden combs, usually in tree hollows or walls.
Bumblebees nest in small ground cavities, furry and docile. Mistaking a bee colony for wasps means killing pollinators you need for a healthy garden.
Check for activity: wasps are smooth, slender, and aggressive near their nest. Bees are fuzzy, slower, and focused on flowers, so observe from a safe distance.
If you’re unsure, snap a photo and compare online using a reliable insect identification guide. Dad quip: “Don’t be the person who squirts a bee hotel with Raid.”
For ground nests, puff insecticidal dust only after confirming it’s not bumblebees, as a wrong call ruins beneficial insects. Bottom line: wrong identification costs you bees and your garden’s pollination.
Hiring a local exterminator for a nest inspection can save you from costly removal mistakes. Professional wasp control services will verify the species before applying any treatment.
When in doubt, call a beekeeper or pest management expert who can relocate bees safely. That simple step protects both your property and the local ecosystem.
If you confirm the nest is wasps, a decoy wasp nest hung in a nearby visible spot can help deter them from rebuilding in the same area after removal.
The Best Time of Day to Treat a Wasp Nest for Safety
Timing is everything when you treat a wasp nest. The early morning or late evening window is your safest bet for wasp control.
Cooler temperatures slow wasps down and cut nest aggression way down. They become sluggish and less likely to swarm during pest removal.
Treatment timing matters because daytime heat makes them hyper alert. A disturbed nest turns into a flying tantrum at midday.
| Time of Day | Wasp Activity | Safety Level |
|---|---|---|
| Early Morning | Low (cold, slow) | High, best for dust |
| Midday | Peak foraging | Low, don’t poke the bear |
| Late Evening | Drops after dusk | High, dark and calm |
| Night | Minimal, but torch attracts | Medium, use red light |
| Wet Weather | Hides, but dust fails | Skip, just no |
Use a wasp killer dust in early morning for direct nest treatment. Late evening is also ideal for spray applications.
Avoid daytime wasp nest removal entirely. Professional pest control experts recommend these low activity windows for safety.
If you must work at night, use a red light to avoid attracting wasps. Wet weather makes dust treatments ineffective and should be skipped. For maximum effectiveness, target nests at these low-activity windows with a residual spray that keeps wasps away for up to four weeks after application.
The Essential Protective Gear for Wasp Nest Removal
For safe wasp nest removal, your gear should make you look like a ghost. Wear light colors, full coverage, and show zero skin. Long sleeves and pants tucked into socks are essential. Add gloves and a veil or beekeeping hat for full protection.
Dark fabrics and quick movements trigger wasp aggression. For nighttime extermination, use a red-light torch. Wasps cannot see this wavelength, letting you approach without disturbance. This professional pest control technique keeps the colony calm.
Always prioritize safety equipment before attempting wasp nest removal. Proper protective supplies prevent painful stings and allergic reactions. Non-conductive sprays rated up to 47,600 volts are a safe option if you must treat nests near electrical equipment.
Light-Colored Clothing
A light colored shirt like white, beige, or pale yellow helps you stay less visible to wasps. Wasps have poor vision for pale shades but spot dark silhouettes easily against the sky.
You are not trying to impress anyone. You are trying to blend into the background for effective pest control.
Avoid anything bright or patterned as well. A solid, light colored long sleeve shirt works best for wasp prevention.
It is cheap, simple, and buys you a few extra seconds if things go sideways. Remember you are not a target if you dress like one.
Full Body Coverage
The full body coverage approach to wasp nest removal is less about fashion and more about survival. It is about avoiding a very bad afternoon. A beekeeper’s veil, thick gloves, and a zip-up coverall form the core body coverage layers. Tuck pant legs into socks, seal wrist cuffs with tape, and never skip the hat.
Proper ventilation matters, though. A stifling suit causes sweat and fogged vision, which leads to clumsy moves. Wasps hate that. Light colors help, since dark shades read as predator to the colony.
A cheap Tyvek suit runs about $15, whereas a ventilated bee jacket costs $50 to $80. The trick is layering thin base, then suit, then veil. No exposed skin, no exceptions. Bottom line: gear up fully before approaching any nest.
Or hire a pest control pro who already owns the right armor for safe removal. This setup is essential for any serious pest management task near a hive. However, remember that natural ingredients do not guarantee safety for bees, as label claims about their safety remain unverified.
Red Light Torch Use
A red light torch is non-negotiable for nighttime wasp removal unless you enjoy insects flying directly into your face with homing-missile accuracy. Their compound eyes cannot see red wavelengths, so your night vision stays sharp while you work safely away from the nest.
Torch safety means never shining a beam directly at the nest opening for more than a few seconds, since wasps will track light like paparazzi. For effective pest control, hold the torch low and angled sideways, using only quick glances to locate the entry point.
A cheap 2-pack under $15 with a red filter lens works fine for this job. Avoid blue or white LEDs, as they ruin your night vision and can agitate the colony faster.
For best results during nighttime removal, keep the beam diffused and off the main flight path. If you need a reliable red light torch for wasp nest treatment, look for models with adjustable brightness and a clip for hands-free use.
Buyer-intent shoppers often pair this with a long-reaching spray to minimize close contact. Always test your red light torch before dusk to ensure the filter is secure and the battery holds charge.
Insecticidal Dust vs. Aerosol Spray for Wasp Nests
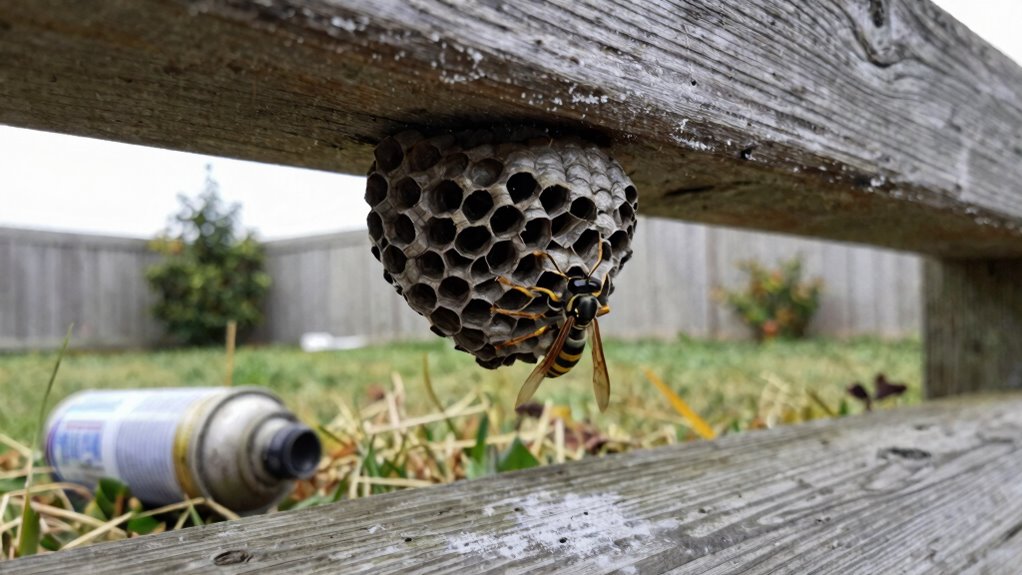
Choosing the wrong tool for a wasp nest is like bringing a butter knife to a sword fight. It only works in very specific situations.
For ground nests, where the colony is hidden deep inside a hole, insecticidal dust is the clear winner. Workers carry the dust inside, poisoning the whole gang over a couple of days.
For exposed paper nests hanging from a porch, a 20‑foot‑range aerosol spray provides instant knockdown. This makes it a quick fix for small, visible targets. If you prefer avoiding chemical sprays, a chemical-free sticky trap like the RESCUE! VisiLure® TrapStik can capture queen wasps without harming beneficial insects.
Dust for Ground Nests
After you have suited up and scouted the nest, the big question is dust or spray. For ground nests, insecticidal dust is the only winner.
The powder puffed into the opening spreads as wasps track it to the core. It kills the colony in one to two days. Use a bulb duster and approach at night with a red light torch. Wasps cannot see that wavelength, so you stay safe.
Dust stays dry and works over days, unlike spray that evaporates. Spray misses deep nests and only hits surface insects. Dust spreads by wasp traffic, carrying the insecticide right to the queen and brood. No sealing is needed, and the colony core is killed quickly. Spray often fails and can trigger alarm wasps, making the job dangerous.
A dad style tip: dust is the slow cooker win. Spray is a microwave that burns your toast. For holes in the ground, skip aerosol chaos. Stick with the powder that does the thinking for you. That is the best pest control method for ground nests. This professional-grade approach is similar to using deltamethrin dusts that offer residual control in hard-to-reach areas.
Spray for Exposed Paper Nests
For exposed paper nests hanging from eaves or tree branches, dust isn’t your friend. It blows away too easily and creates a mess instead of solving the problem.
Aerosol sprays win here hands down. Their range hits 15 to 20 feet, letting you stand well back from angry fliers. Foam sprays tend to have a shorter reach, making them better for smaller, accessible nests rather than high eaves.
Spray accuracy matters, too. A foamy, targeted jet coats the nest surface, trapping wasps on contact.
Best results come from small, umbrella-shaped nests. One can costs between $8 and $15, enough for several treatments.
Spray at dusk when wasps are sluggish and home. This timing boosts safety and effectiveness against the colony.
The spray won’t penetrate deep into the nest’s core. So recheck after two days for any survivors.
If they rebuild, repeat the spray or switch to dust for ground nests. That is a different pest control method entirely.
For exposed nests, aerosol is quick, safe, and satisfying. It works like a fire extinguisher on a campfire, but with more vengeance.
How to Apply Dust to Ground and Concealed Wasp Nests
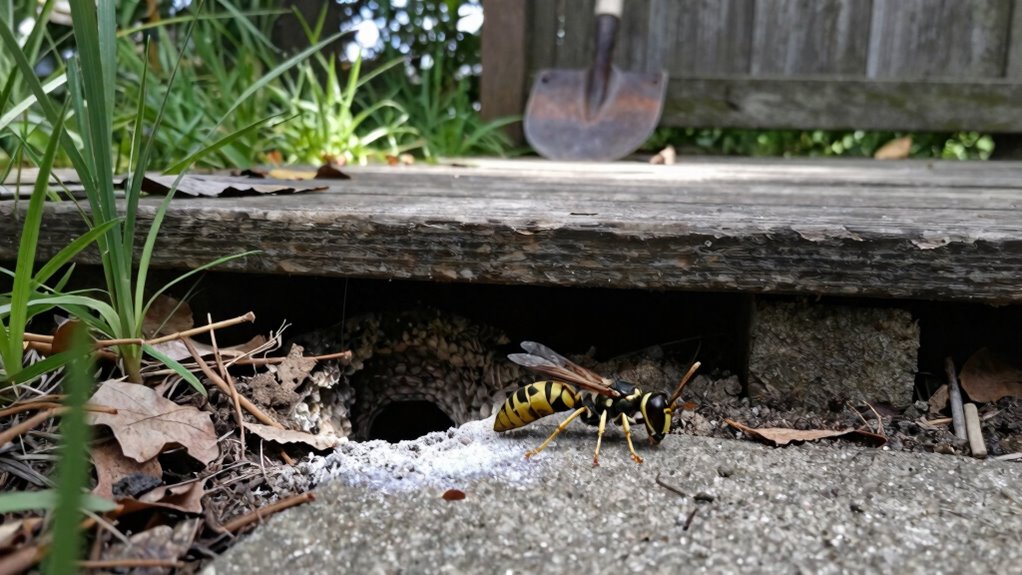
Since dust works best when wasps track it deep into the nest, direct application at the entrance is the whole ballgame. For ground nests, use a bulb duster, puffing insecticidal powder right into the hole at dusk. Never treat at night, because flashlight beams can attract wasps straight to your face. Natural oil-based repellents provide a safe, humane non-killing method for keeping stingers away without toxic chemicals. Late season nesting means fall nests in low traffic yards can just be left until frost kills them. Do not seal the entrance; wasps need to walk through the dust freely for effective control. Avoid wet weather, as dust only works dry. Retreat calmly if they emerge, and wait for them to settle before trying again. For the best pest control results, time your wasp nest treatment for dry evenings.
What to Do When Wasps Swarm During Treatment
A sudden swarm is every wasp warrior’s nightmare. When wasps erupt during treatment, do not panic.
Retreat calmly and slowly, moving at least 30 feet away. Wasps follow movement, so a steady, quiet departure is key.
Wait 20 to 30 minutes for the colony to settle. Their aggression usually fades after losing sight of the threat.
For patient recovery, avoid returning too soon. Let the insecticidal dust work undisturbed.
Post treatment cleanup involves checking gear for stowaway wasps before removing protective clothing. The table below outlines swift actions during a swarm.
| Action | Why It Works | When to Do It |
|---|---|---|
| Retreat slowly | Reduces alarm pheromone release | Immediately after swarm |
| Wait 20 to 30 minutes | Allows wasps to calm | After retreat |
| Check clothing | Prevents stings later | Before removing gear |
| Inspect nest entrance | Confirms dust is being carried in | After waiting period |
| Resume treatment | Only if no wasps remain agitated | After calm return |
When to Abandon DIY and Call a Professional Exterminator
Not every wasp problem needs a heroic DIY stand. If anyone in the household has known allergic reactions, a single sting can turn a backyard chore into an ER visit.
That alone warrants calling a professional exterminator.
Structural infestations, such as nests tucked inside wall voids or attic eaves, defeat over the counter sprays.
Those sprays only hit surface workers and miss the hidden core. Professionals use injected dusts and targeted tools for complete wasp nest removal, and they may also seal entry points with steel wool barriers to prevent future nesting in the same voids.
Charging roughly $150 to $500 depending on access and colony size, it is a fair trade for avoiding ladders and angry swarms.
Walk away from DIY when the nest is unreachable, oversized, or near high traffic doors.
The bottom line is simple. If retreat feels smarter than advance, call a licensed exterminator.
They get paid to be brave, and you get to stay indoors.
The Risks of Blocking a Wasp Nest Entrance (And How to Prevent Damage)
Before sealing anything, use natural repellents like peppermint oil spray around the area to discourage return. But repellents alone won’t kill an active colony, so you need a more targeted approach for wasp nest removal. For example, peppermint oil pellets offer a slow-release deterrent that can last up to 90 days in dry areas.
For that, stick to proven alternative methods: apply insecticidal dust at dusk, let wasps carry it inside, and never block the hole until activity stops for a full week. Blocking too soon traps angry wasps inside your walls, which can lead to stinging hazards and structural damage.
The bottom line is that patience beats a plug every time, especially when you want safe wasp control and long-term pest prevention. A quick fix may seem tempting, but a delayed seal ensures the colony is fully eliminated before you close off the entry point.
Use a flashlight to check for lingering wasps at dawn, and always wear protective gear during pest inspection. If you prefer a professional wasp extermination service, call a licensed contractor to handle the nest removal safely.
Frequently Asked Questions
Can I Use a Vacuum to Remove a Wasp Nest?
No, using a vacuum to remove a wasp nest is not a safe idea. The vibrating motor and airflow will agitate the wasps and trigger an attack long before they get sucked in.
For small exposed nests, aerosol sprays with a 15 to 20 foot range work much better. These knockdown sprays let you treat from a safe distance without disturbing the colony.
If you have a hidden or concealed wasp nest, puff insecticidal dust into the entry hole instead. The wasps will carry the dust deep inside, which kills the entire colony in one to two days.
Think of that dust application as a slow acting bait delivery system. It avoids the messy, angry buzzing vacuum bag that could rupture mid job.
For the best pest control results, always pick a product labeled for the specific nest type you see. This buyer intent approach saves you time, money, and a potential sting emergency.
What Should I Do if a Nest Is Inside a Wall?
Treating a nest inside a wall is tricky, and standard wasp sprays rarely reach the colony’s core.
Instead, use insecticidal dust puffed directly into the entrance hole, since wasps carry the dust inward on their bodies.
This method kills the entire colony within 1 to 2 days, making it one of the most effective DIY pest control solutions for hidden nests.
Once the colony dies, you’ll need professional pest control access to remove the nest and any debris safely.
After removal, wall cavity repair is essential to seal the area and prevent future re-infestation from new queens or other pests.
Attempting to vacuum the nest is ill-advised, as the suction can agitate thousands of angry wasps and trigger a swarm indoors.
For large or deep infestations, call a pest control pro right away, since their targeted treatments and equipment often cost less than repairing drywall damage from a botched DIY attempt.
When buying pest control products for wall nests, always look for dust formulations labeled for voids, cracks, and crevices, not aerosol sprays.
User intent often centers on fast, low-risk removal, so prioritize products with a long residual effect and a powder duster applicator for precision.
A quality insecticidal dust like deltamethrin or boric acid works well, but always confirm it’s safe for indoor wall cavities and pets.
If you’re unsure about the nest size or location near electrical wiring, schedule a local inspection, as hidden colonies can cause structural or allergy issues.
Smart buyers combine a dust treatment with a follow-up sealing kit, and they always keep a wasp spray on hand for emergency spot treatments outside.
How Long After Treatment Is It Safe to Remove the Nest?
Wait at least 24 to 48 hours after treatment before removing the nest. The insecticidal dust needs that treatment duration to kill the colony, including the queen.
Nest removal timing is key for pest control success, as any surviving wasps will attack if disturbed too soon. Check for no activity by day or night first to ensure the treatment worked.
Use a long stick to gently tap the nest. If no wasps emerge, it’s safe to knock it down and dispose of it.
Don’t rush a dead nest is just paper, but a live one is a problem. So be patient it’s better to wait an extra day than get stung.
For safe wasp nest removal after spraying, buyers often ask how long to wait. Final recommendation wait at least two days, then proceed cautiously.
Do Wasps Return to the Same Nest Location the Next Year?
No, wasps do not reuse nests the following year. Each colony dies off in winter, leaving the empty nest behind.
Reused nests would be a clever trick, but wasps lack that relocation behavior. Come spring, a new queen starts fresh, ignoring old structures.
A leftover nest is merely a paper relic, not a returning hazard. That means you can safely ignore it or remove it at your leisure.
However, if you are dealing with active wasp activity near your home, professional pest control products can help. A targeted wasp spray or trap will handle any new colony that tries to settle nearby.
For year round protection, consider sealing gaps and eaves to block potential nesting spots. This simple step prevents future infestations and saves you from repeated pest control service calls.
If you are ready to buy wasp removal supplies, look for fast acting sprays and long lasting bait stations. These products give you peace of mind without the worry of old nests attracting new queens.
What Natural Remedies Work for Deterring Wasps?
Natural deterrence works best as prevention, not a cure for wasp infestations. Mix peppermint oil with water and a drop of dish soap to create a homemade wasp repellent spray.
Spray this solution around eaves, entry points, and potential nesting sites to confuse wasps’ scent trails. Garlic spray made from blended, strained cloves and water gives a similar kick to keep wasps away.
Reapply after rain to maintain effectiveness for ongoing pest control. Neither remedy kills colonies, so pair them with early season checks for long term wasp prevention.
For active nests, skip DIY deterrents and call a professional exterminator. Deterrents just make wasps grumpy elsewhere without solving the problem.
Bottom line: use these cheap, smell friendly fixes to keep new nests away. They are ideal for preventing wasp problems before they start, not for fighting existing ones.


