
Finding a wasp nest near your home doesn’t have to mean calling an expensive exterminator. Spraying the nest yourself works if you follow the right steps, but everything hinges on timing and gear.
Treat at dawn when wasps are sluggish, stand 15–20 feet back, and hit the entry hole with a pyrethroid aerosol for five seconds. You’ll also need leather gloves, a bee veil, pants tucked into boots, and a respirator with P100 filters—no shortcuts allowed.
Wait 24 hours, then double-bag and toss the nest. Miss one step, and the wasps win.
This guide covers the exact tools, safety checks, and timing that separate a clean job from a painful mistake. Stick around to get the full breakdown for handling the job safely and effectively.
At A Glance
- Treat ground nests at dawn or dusk when wasps are sluggish for maximum safety.
- Wear protective gear, including a bee veil, long sleeves, and leather gloves.
- Use aerosol spray from 15-20 feet away for ground or exposed hanging nests.
- Apply insecticide dust into wall voids for hidden nests, then wait 24-48 hours.
- Wait a full day after no activity before sealing the nest site completely.
7 Signs of a Wasp Nest You Can Spot From Ground Level

You don’t always need a ladder to know wasps have moved in. Ground nests are a dead giveaway, often found in old rodent burrows, under logs, or in dense mulch.
Look for a steady stream of wasps entering a single hole in the dirt, especially at dawn or dusk. These nests can hold hundreds of yellow jackets, and stomping near one is a bad idea. Dad learned that the hard way.
A steady stream of wasps at one hole means hundreds below—stomping near it is a mistake.
For safe wasp nest removal, mark the entrance with a stick during the day. Then treat it at night with a standard aerosol spray that offers long-lasting residual action to prevent future nest building. You’ll want to stand back at least 15 feet for proper pest control.
The bottom line is spot ground nests early. You skip the ladder entirely and avoid a costly pest control service call.
The Safest Time of Day to Spray a Wasp Nest
If there’s one thing wasp removal teaches you, it’s that timing is everything. The safest window to spray a nest is actually at dawn or dusk.
At these low light hours, most wasps are home and sluggish from cooler air temperatures. They react slowly, so a targeted spray like Spectracide’s 27 foot jet hits the colony directly.
Spraying midday is a bad idea. Heat makes wasps hyperactive and aggressive while many are out foraging.
You risk missing half the colony and getting chased. Dawn works best because temperatures are lower and wasps are docile.
The nest’s paper structure absorbs chemicals well. Wait 24 hours after spraying to confirm the nest is dead.
Timing always beats bravado for effective pest control. Always check wind direction to avoid chemical drift into the face or hair.
Safety Gear You Need Before Approaching a Wasp Nest
Preparation without paranoia is the right mindset when suiting up for wasp duty. Start with a full-face shield or safety glasses because stings near eyes are not a joke.
Wear thick, long-sleeved clothing, tuck pants into boots, and pull on leather gloves. For chemical sprays, a respirator is non-negotiable; skip it and you’re inhaling neurotoxins.
Respirator fit testing guarantees the mask seals properly, so buy a half-face model for $25 to $40 with P100 filters. If using a ladder, ladder stability is critical; set it on firm ground, extend legs fully, and have a spotter hold the base.
A shaky ladder plus wasp panic equals a bad day. Avoid cotton hoods because they trap stings.
Instead, use a bee veil or wide-brim hat. Consider placing reusable traps at least 20 feet away from your work area to reduce wasp activity while you suit up. Bottom line: suit up methodically, test your gear, and treat every nest like it’s guarding a secret.
What Actually Happens When You Spray a Wasp Nest
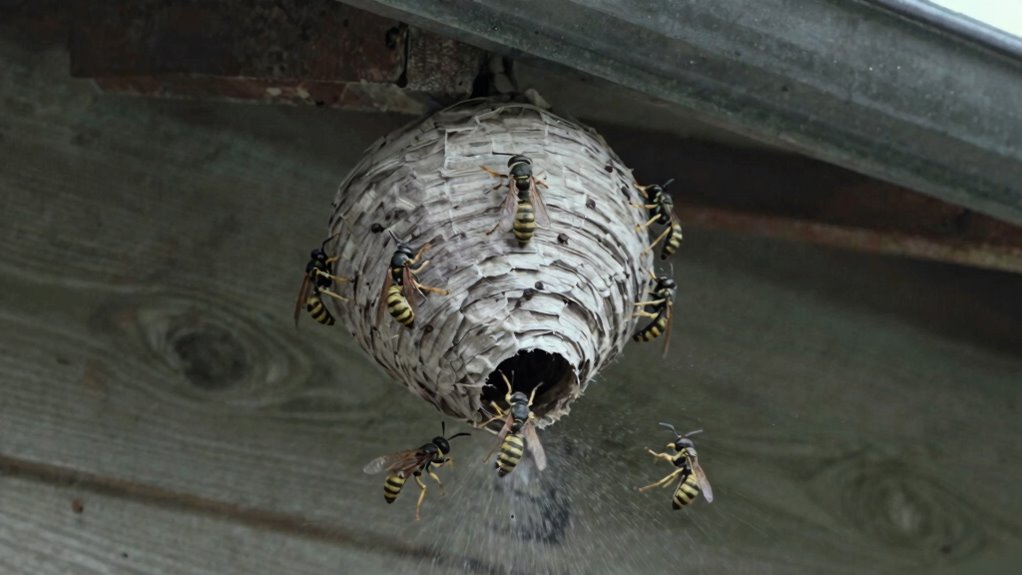
When that aerosol stream hits the nest, the pyrethroids in the spray chemicals overwhelm a wasp’s nervous system. This causes almost instantaneous knockdown, dropping most wasps within seconds. But the real pest control trick is that the spray coats the nest surface. It gets absorbed and spreads to returning foragers, slowly poisoning the entire colony over the next 24 hours. For added safety, spraying at sunrise or sunset reduces accidental stings and wildlife contamination.
Instant Knockdown Action
The moment that aerosol stream hits the nest, the chemistry kicks in fast within seconds really. This rapid knockdown is the active ingredient, usually a pyrethroid, short-circuiting each wasp’s nervous system.
They drop mid-air, sometimes before they even register the threat. The nest coating does double duty as a sticky, wet layer that clings to every paper cell and waiting wasp.
Any returning flyer picks up a fresh dose on contact, like a welcome mat that bites back. For a typical paper nest under your eaves, this initial blast is your first and best move against wasp infestations.
You will see a frantic few seconds of buzzing, then silence. It is not pretty, but it is effective for immediate pest control.
Spray from a distance, let the foam work, and stay back. This professional grade knockdown ensures you handle the problem safely and quickly. This method works in part because the spray provides quick knockdown from direct contact, ensuring any wasp hit by the stream is immediately neutralized.
24-Hour Colony Elimination
Spray at dusk for best pest control results. The dead don’t forage, so timing is key.
| Timeframe | What Happens to the Nest |
|---|---|
| 0-2 Hours | Immediate wasps drop and the nest appears quiet. But some foragers remain active outside. |
| 2-6 Hours | Survivors become disoriented and the chemical is tracked deeper into the comb. This disrupts the colony’s communication. |
| 6-12 Hours | Peak chemical effect occurs as returning foragers track poison to the queen. This queen elimination step is critical for full hive removal. |
| 12-24 Hours | Visible movement stops entirely. The last survivors succumb to the residual chemical effects. |
| After 24 Hours | Safe to approach with a broom and knock it down. Repeat offenders are free and the nest is gone. |
Use this targeted wasp knockdown method for complete elimination. The nest removal process is straightforward once the colony dies. For a chemical-free alternative, consider a natural oil-based repellent that can be hung near nesting areas to deter wasps over several months.
How to Spray an Aerial Wasp Nest Step by Step

First, confirm the nest is truly aerial, hanging above ground and not buried or tucked inside a wall. Spraying a ground nest with an aerosol stream is a surefire way to attract a swarm of defensive stinging insects.
For effective wasp control, slip on long sleeves, pants, gloves, and goggles before you approach. Dawn or dusk is the ideal window, when wasps are sluggish and clustered near the nest entrance.
Stand 15 to 20 feet back, aim the nozzle directly at the entry hole, and spray for a solid five seconds. The pyrethroid-based foam coats the surface, killing on contact and leaving a residual layer that targets returning foragers.
Wait a full 24 hours before removal, because knocking it down too early invites a rude airborne greeting. This pest management method delivers fast knockdown, but only if you respect the distance and timing without taking shortcuts.
For best results, check the wind direction so the spray drifts onto the nest, not back into your face. Reapply the foam if you see any surviving wasps after the first pass, as some nests have multiple entrances.
Once the nest is dry and quiet, use a long pole to knock it down and dispose of it in a sealed bag. For long-term control around the property, place ant bait stations near baseboards and corners to target any foraging pests that may attract wasps. If you prefer professional-grade wasp nest removal, many local exterminators offer same-day services for aerial colonies.
How to Treat Ground Nests Without Getting Stung
Ground nests hide a different kind of trouble. Yellow jackets love old rodent holes, and stepping close is a bad idea.
Nest grading matters first. Mark the entrance with a stick, then check activity from twenty feet away at dusk.
Don’t flatten the mound. That just enrages them.
| Step | Action |
|---|---|
| 1 | Locate entrance at dusk |
| 2 | Wear protective clothing (gloves, veil) |
| 3 | Apply dust insecticide, not spray |
| 4 | Wait 48 hours, then recheck |
| 5 | Cover hole with soil |
Protective clothing means thick pants tucked into boots, plus a bee veil. Dust works better than liquid for ground nest treatment.
It clings to wasps as they crawl out. Apply a quarter cup of dust insecticide, then back off.
Check in two days. If still active, repeat once.
No need to get heroic. Just slow, methodical, and well-dressed.
For the safest wasp nest removal, choose a dust product labeled for yellow jackets.
Your goal is to eliminate the colony without getting stung. That means patience and the right gear.
Non-toxic, food-based baits also work well for monitoring activity near the nest without risking stings.
How to Treat Wasp Nests in Wall Voids
Wall voids can hide wasp nests, so finding every entry point is your first priority. Check for cracks, vents, and gaps around siding carefully.
Insecticide dust works far better than liquid spray for treating these hidden nests. Puff the dust directly into the void, where it clings to wasps and travels deeper into the colony. Professional-grade products like Delta Dust Deltamethrin BA1002 offer residual control for heavy infestations without spray mess.
Liquid spray will just soak and evaporate, missing the main nest. After a few days, confirm no wasp activity remains before sealing entry points.
Use caulk or foam to close those gaps permanently. Never seal a live nest or you will trap a very angry, buzzing surprise inside your walls.
Identifying Entry Points
Wasps do not pay rent, so they treat wall voids like prime real estate. During nest inspection, look for them slipping into tiny gaps. Cracks under eaves, gaps around vents, or holes where siding meets trim are common trouble spots. Wasp behavior peaks at dawn and dusk, so those are the best times to spot entry points when workers fly in and out.
Focus on roof eaves, under overhangs, where you see wasp traffic and small holes. Exhaust or attic vents may show buzzing and chewed wood. Siding gaps where panels meet can let light peek through. Window frames with loose seals often have a constant flyby pattern. Foundation cracks near ground level can show dirt or mud disruption.
Check these spots carefully for professional pest control results. A tiny crack like 1/8 inch is enough for a queen to enter. Seal them after treatment, or they will lease again next year. High-quality brush seal strips with nylon bristles handle irregular gaps that wasps commonly exploit around weathered frames. The bottom line is to find the door and block the lease for good.
Insecticide Dust Application
When treating a nest hidden inside a wall void, aerosol sprays often fail because they cannot reach the colony. The solution is a dust treatment applied directly through the entry hole with a hand duster or bulb puffer. You puff insecticide powder into the wall cavity, and the wasps track it back to the nest. It is grim but effective for complete nest elimination. Look for products containing pyrethroids like deltamethrin or cyfluthrin. A common option is Drione Dust, costing about $15 to $20 for a 1 pound bottle. Apply at dawn or dusk when the colony is home. Go easy because a little dust goes a long way. Too much clogs the void and blocks wasp movement. Wait 24 to 48 hours for full elimination. Dust treatments work slowly, methodically, and silently like a tiny deadly fog. This void injection method ensures you reach the hidden colony without spraying. If you prefer a liquid barrier treatment, consider using a low-odor bifenthrin spray that lasts 4 to 6 weeks after application.
Sealing After Treatment
Patience pays off after dusting the void. Sealing the entry hole too soon traps dying wasps inside your walls, where they decompose and attract carpet beetles.
Wait three to five days, letting the insecticide do its grim work. Then, grab exterior-grade silicone caulk, not the cheap stuff, and get busy.
| Sealing Task | Best Material |
|---|---|
| Small holes (drill bits) | Latex caulk, ~$6/tube |
| Cracks along siding | Polyurethane foam, ~$9/can |
| Gaps around pipes | Silicone sealant, ~$7/tube |
| Large voids | Expanding foam + tape |
Focus on sealing cracks around eaves and blocking gaps near vents. Use that foam for anything wider than a quarter-inch.
Let it cure fully for twelve hours, minimum. Then inspect monthly; wasps are stubborn, and so should you be.
Bottom line: seal slow, seal tight, keep carpet beetles out of your snack drawers. This pest control routine prevents future infestations and protects your home. Use weatherproof galvanized steel for any vents you reinforce, as it resists corrosion and animal damage.
When to Skip DIY and Call a Professional Exterminator
Why call a pro instead of grabbing a spray can from the hardware store? Some nests require a professional assessment, not a backyard hero move.
Severity thresholds are key for safe removal, like nests larger than a football, hanging twenty feet up, or tucked inside a wall void. Aerial sprays from 22 to 27 feet work fine for small, exposed nests.
But a pro brings specialized gear and industrial grade insecticides for tricky spots like ground nests or eaves near windows. They will identify the species too, sparing beneficial pollinators.
If you are allergic, or the nest is in a hard to reach soffit, skip the DIY option. Pay 150 to 300 dollars for a pest control service.
It is cheaper than an ER visit and way less stingy. The bottom line is to call a pro for big, high, or hidden nests, while sprays are for the easy ones.
3 Natural Wasp Repellents That Deter Without Killing
For wasp problems without the guilt, try three natural repellents. Spearmint oil spray, peppermint scent, and aromatic oil mixes offer a kill free solution.
These strong scents overwhelm a wasp’s sense of smell. They make your porch or vent a no go zone without harming a single stinger.
Simply spritz these around eaves or entry points. Reapply weekly for best results as a gentle ongoing deterrent. For longer-lasting, weather-resistant protection, consider slow-release sachets that can last up to 90 days.
Spearmint Oil Spray
Spearmint oil spray provides a quieter victory compared to chemical wasp sprays, keeping both you and the wasps alive. This natural pest control method uses spearmint efficacy to overwhelm their sense of smell, making eaves and vents inhospitable without harming insects.
Mix 10 to 15 drops of pure spearmint oil with a cup of water in a spray bottle, which costs about $8. Reapply every three days or after rain to maintain the deterrent effect.
Spray directly into nests, entry points, and around patios to encourage wasps to relocate instead of die. It won’t kill a nest instantly, but it is a decent trade-off for avoiding insecticide assault.
For ongoing prevention without casualties, spearmint spray is a gentler, high-maintenance choice for buyers seeking a non-lethal solution. This method aligns with eco-friendly, chemical-free formulations that are safe for humans and pets.
Peppermint Scent Repellent
Peppermint scent repellent works just like spearmint oil spray. It is a high-maintenance friend that prefers wasps alive and annoyed.
This repellent functions as a powerful scent deterrent. It overwhelms wasp sensitive smell receptors without toxic chemicals.
A homemade peppermint spray costs about $3 per batch. Mix 10 to 15 drops of pure peppermint oil with a cup of water.
Apply directly to eaves, vents, and potential nesting spots at dusk. Reapply every three days, or after rain, since the scent fades quickly.
It is safe around pets and plants, unlike pyrethroid sprays. Does it work for pest control? Yes, for prevention.
It will not touch an active nest. But it keeps new wasps from moving in.
Think of it as a polite, persistent “no vacancy” sign. For long-term deterrent, it is the best cheap, non-lethal option available.
For even longer-lasting coverage, try using pre-mixed peppermint oil sprays from brands like Mighty Mint that are ready to use and last for weeks.
Essential Oil Mixes
Combine multiple essential oils to create a homemade wasp repellent that confuses and deters wasps without killing them. A simple mix of 10 drops each of spearmint, clove, and lemongrass in a spray bottle with water and a squirt of dish soap works wonders.
It doesn’t harm the wasps. It just scrambles their scent signals, making your porch feel like a bad neighborhood to them. Spray this pest control blend around eaves, vents, and door frames every few days.
Reapply after rain for the best wasp deterrent results. Timing matters: apply it early in the wasp lifecycle, before colonies grow. Avoid common nest removal mistakes by just reapplying after they leave. The total cost is under $10 for oils, and they last for weeks. This natural wasp spray is cheap, safe, and oddly satisfying.
Think of it as passive-aggressive aromatherapy for pests. For effective wasp control, this method helps you keep your space clear without harsh chemicals. Concentrated blends require dilution but extend product life.
Seal Entry Points to Prevent Future Wasp Nests
Sealing entry points is the single most effective way to keep wasps from turning your home into a seasonal condo. This habitat modification makes your house a no-vacancy zone for pest control success.
Start by inspecting eaves, vents, and soffits for gaps the size of a pencil eraser. Wasps squeeze through anything bigger, so target these common wasp entry points.
Install backdraft dampers on exhaust vents for about $10 each. These cheap plastic flaps let air out but block wasps coming in.
Caulk cracks with silicone sealant and stuff larger holes with steel wool. Then patch with hardware cloth for a permanent wasp prevention solution.
Check attic vents, dryer vents, and window frames during your inspection. Use expanding foam for deep gaps, but don’t over-apply the sealant.
Knock down empty nests after curing your repairs. New queens ignore old nests, so removing them helps deter future infestations.
Bottom line: spend an afternoon sealing now to save a weekend of spraying later. This proactive wasp removal approach keeps your home safe all season.
The 24-Hour Rule: Remove and Dispose of Nests Safely
The 24-Hour Rule means waiting a full day after spraying before you touch the nest. It sounds like overkill, but aerosol sprays work slowly by coating the nest’s surface so returning wasps absorb the poison. Within 24 hours, the entire colony is knocked out.
If you touch it sooner, you risk getting stung by survivors. For safe nest removal, check for stillness by circling the area at dusk.
If you spot movement, wait longer. Patience beats an emergency room visit for pest control.
For nest disposal, double-bag the mess using thick garbage bags. Drop the nest in, seal it tight, and toss it in an outdoor bin.
The old paper crumbles easily, so it feels like handling a soggy cereal box. After bagging, hit it with a stick from a safe distance.
No buzzing means you are safe. Still buzzing means back away slowly and maybe re-spray for total insect elimination.
Bottom line: wait the full day, bag it, and be done. Your future self and your stinger will thank you for using this proven wasp removal method.
Why Knowing Your Wasp Species Matters for Removal
Knowing your wasp species is the difference between a successful removal and a surprise encore of stings. Some wasps are aggressive nest defenders, whereas others are solitary and harmless.
Beneficial species identification matters for pollinator protection. Paper wasps, for instance, eat caterpillars and pollinate flowers, so killing them unnecessarily harms your garden.
If you spray a yellowjacket nest thinking it’s a docile mud dauber, expect a painful counterattack. Aggressive types like yellowjackets require full protective gear and long distance sprays of 15 to 27 feet.
Pollinators can often be left alone or relocated with minimal risk. For professional pest control, knowing the difference helps you choose the right wasp removal method.
Check the nest’s location and wasp size to make your decision. Smaller, slender wasps likely benefit your yard.
Save the heavy spray for the angry ones. This practical approach ensures safe wasp extermination services or simple relocation.
Frequently Asked Questions
Can Wasps Sting Through My Clothing While I Spray?
Yes, wasps can sting through your clothing even while you are spraying a nest. Thin fabrics like cotton t shirts offer almost no protection against a wasp’s stinger.
Thicker materials like denim or canvas provide more resistance, but soaked spray repellency can actually weaken the fabric’s barrier. That is why pest control experts recommend wearing protective gear such as long sleeves and thick pants before you spray.
To stay safe, always maintain a distance of 15 to 20 feet from the nest when using your wasp killer. This distance is your best defense because spray alone will not stop a determined wasp from striking through your clothes.
If you are shopping for wasp sprays, look for products with a long range jet stream to keep you farther from the target. For heavy infestations, consider investing in a professional grade aerosol or a full protective suit for peace of mind.
What Should I Do if Wasps Fly Out Mid-Spray?
If wasps fly out mid-spray, don’t panic. Stop spraying immediately and back away to a safe fallback position at least 20 feet from the nest.
That fast, 27-foot stream works best from a distance, so you don’t need to stand close. Wait about 10 minutes for the colony to settle down before you re-approach.
This is like a timeout for the nest, letting the wasps cool off and reduce their aggressive response. For best results, plan your next spray for dawn or dusk when they’re sluggish and less likely to swarm.
When you return, aim directly at the entry hole and use a targeted wasp killer with a wide-reaching jet for maximum nest penetration. Choosing an insecticide with a residual kill effect also helps prevent stragglers from rebuilding the same spot.
If you’re shopping for a reliable product, look for fast knockdown formulas and a trigger that locks for safe, hands-off spraying. Always read the label for re-treatment intervals, and keep a spare can ready for follow-up invasions.
Remember, your safety is the top priority, so never chase a flying wasp with an active spray. A calm, staged approach ensures you eliminate the nest without getting stung.
Once the nest is silent, knock it down with a long pole and dispose of it in a sealed bag. Then, inspect your eaves, soffits, and vents for new nests weekly during peak season.
For ongoing protection, consider a preventative barrier spray around your home’s perimeter to stop future wasp colonies from settling. That way, you’ll spend less time reactively dealing with angry insects and more time enjoying your yard.
Do Wasp Sprays Work on All Wasp Species Equally?
Not really, no. Wasps vary in toughness and behavior, so aerosol efficacy depends heavily on species and nest location effects.
For paper wasps in exposed eaves, sprays work fast. They are sitting ducks.
Ground-nesting yellowjackets are shielded by soil. A direct stream often misses them.
The active ingredient list is broadly effective for most stinging insects. But thick nests or deep voids reduce contact and waste product.
To get rid of wasps fast, choose a spray labeled for your specific pest. Otherwise you risk wasting time on a stubborn colony.
Buy targeted wasp killer now to ensure a direct hit and complete nest elimination.
How Long Does Wasp Spray Residue Remain Toxic?
Chemical wasp sprays typically remain toxic for 1 to 4 weeks after application. Rain and direct sunlight speed up that residue breakdown, so always check your local weather forecast before treating a nest.
The persistence of the active ingredients varies by product. Pyrethroid based sprays cling to surfaces longer, especially in shaded, dry spots where UV exposure is low.
Most pest control labels advise retreating after heavy rain or power washing. For active nests, one direct application usually knocks the colony out within 24 hours.
Don’t touch the treated area with bare hands. That’s a sting worthy mistake that could land you in urgent care.
Bottom line: always read the re entry time on the label. That simple step keeps your yard and family safe while you handle hornets, yellowjackets, or wasps.
Can I Remove a Wasp Nest in Winter Without Spraying?
Yes, you can remove a wasp nest in winter without using any spray at all. The nest is empty because wasps die off naturally in cold weather.
Knock the nest down with a broom and wear gloves just to stay safe. Since no colony lives inside, this is a simple and low risk job.
New queens never reuse old nests, so removal helps prevent spring confusion. For extra protection, inspect nearby cracks and gaps in your siding or eaves.
Sealing those entry points is a proactive pest control step. It blocks future queens from building nests in hidden areas.
This winter removal method is a smart, chemical free approach for homeowners. If you want long term wasp prevention, consider investing in a quality caulk or foam sealant.
For active infestations in warmer months, you will need an aerosol wasp spray or powder dust. Choose products labeled for wasp and hornet control to ensure fast knockdown.


