
Checking a cat for ticks is a quick, hands-on routine that keeps these tiny bloodsuckers from becoming a big problem. Run your fingers slowly over the whole body, pressing gently for small, hard lumps about the size of a sesame seed.
Ticks love warm, tucked-away spots like armpits, groin folds, between toes, and inside ear flaps, so don’t rush those areas. A bright light helps you part the fur and check the skin directly, turning a guess into a clear answer.
This guide walks you through a full-body sweep, from head to tail, plus what to do if you actually find one attached. You’ll also get tips on safe removal, when to call the vet, and simple prevention steps for the future.
Grab a treat for bribery, read on, and you’ll have the confidence to check your cat properly in under five minutes.
At A Glance
- Run your hands over your cat’s entire body to feel for bumps the size of a sesame seed.
- Ticks often hide in warm spots like armpits, groin folds, and under the collar.
- Always check between toes and inside ear flaps with a bright light.
- Inspect your cat regularly, especially during tick season from October to March.
- A towel wrap can help keep a squirmy cat calm during a thorough search.
Why Checking Your Cat for Ticks Matters (And How to Start)
Ticks are the uninvited house guests of the parasite world, tiny and quiet, and surprisingly good at overstaying their welcome. Checking a cat matters because these little bloodsuckers transmit nasty diseases, like tick paralysis, which starts with a wobbly walk.
Ticks are quiet, uninvited house guests, and checking your cat stops nasty diseases like tick paralysis before they start.
Tick prevention is far simpler than emergency vet visits, so trust in a safe routine. The key lies in understanding seasonal risks; in Australia, peak season runs October to March.
But ticks linger year-round in many spots. Wet springs and mild winters make them multiply like gossip.
Outdoor cats face higher exposure, but even indoor ones aren’t immune if you bring ticks home. Start by running fingers through the cat’s coat, feeling for lumps or bumps.
It’s a quick, calm routine that feels like a mini massage, catching problems before they balloon. Regular checks save headaches and costly treatments. Applying permethrin repellents to clothing can help prevent bringing ticks indoors after outdoor activities.
What You’ll Need to Check and Remove Ticks
You will need a few basic tools: fine-tipped tweezers, a good light source, and possibly gloves if you feel squeamish. Blunt tweezers can squeeze the tick and risk infection, so avoid them. Stainless steel tools ensure durability and rust resistance for safe, chemical-free removal.
To check effectively, keep your cat calm using treats or a second person for restraint. Wrestling an offended feline is nobody’s idea of a good time, so plan ahead with pest control strategies.
Have a sealed container or rubbing alcohol ready to dispose of any ticks you remove. Flushing ticks down the toilet is not reliable because they can survive that shockingly well.
For ongoing protection, consider adding a topical flea and tick treatment to your cat’s routine. Professional pest control services can also help if ticks become a persistent problem in your home or yard.
Proper Tools Selection
So what does someone actually need to check and remove ticks? A bare minimum setup is essential, but cutting corners on tools is like bringing a spoon to a knife fight. The right gear makes tick lifecycle disruption and habitat prevention possible.
Fine tipped tweezers or a tick removal tool are your best bet. Look for stainless steel, pointed tweezers costing about $8 to $15, or a Tick Twister for $10. These grab the tick’s mouthparts, not its body, reducing paralysis risk during pest control. Stainless steel tools that are sterilizable and reusable prevent cross contamination.
A bright flashlight or headlamp reveals ticks hiding in dark fur, under armpits, or between toes. A small LED flashlight costs $10 to $20, and a headlamp is around $15. Darkness is a tick’s best friend, so proper lighting is key for thorough tick checks.
Disposable gloves and a sealed bag prevent contact with tick fluids. Latex or nitrile gloves cost $5 for a box, and a zip lock bag is $1 for safe disposal. This setup supports effective tick prevention and safe pest removal.
Spend $20 to $30 now on these tools to avoid a vet bill later. Dad joke: A tick’s favorite game? Hide and sneak.
Cat Restraint Techniques
With the right tools lined up, the next hurdle is convincing a cat to sit still long enough for a tick check. Cat restraint here does not mean wrestling, it means controlled handling for effective pest control.
A calm cat is a cooperative cat. Start by placing the cat on a non-slip surface, like a bathmat, to prevent scrambling.
Wrap it loosely in a towel, leaving one body section exposed at a time. This is the classic purrito technique for nervous felines during tick removal.
For a particularly squirmy cat, have a helper gently scruff the neck, mimicking a mother cat’s hold. This triggers a temporary freeze reflex, but use it sparingly to avoid stress.
Never chase the cat, that just adds anxiety. Instead, work in short, patient sessions for better flea and tick management.
A treat bribe afterward builds goodwill for next time. This makes tick prevention routines easier over the long term.
Tick Disposal Methods
Disposing of ticks is not just about dropping them in the trash and hoping for the best. A live tick can crawl right back out, and a dead one still needs proper handling.
Effective pest control for ticks means making certain the job is done, no second chances. Submerge the tick in rubbing alcohol inside a small jar or baggie with enough liquid to cover it.
This kills it fast, usually within minutes. It is a reliable method for killing ticks and eliminating any risk of re-infestation. For thorough protection against bites, consider using an EPA-approved repellent like DEET or Picaridin.
Flush the tick down the toilet by dropping it into the bowl and flushing immediately. Water disposal is simple and removes the chance of it escaping into your home.
Seal the tick in transparent tape, then toss it in the trash. This keeps it trapped and visible for identification if you need to show a pest control professional.
Burning or crushing ticks is risky because they can release infectious fluids. Stick with one of these clean methods for total tick removal.
Then wash your hands and the bite site with soap and water. This helps prevent any bacteria from spreading and keeps your home safe.
How to Check Your Cat for Ticks by Touch
Your fingers are the first line of defense in the hunt for ticks, and they are surprisingly good at it. They can feel tiny bumps, maybe the size of a sesame seed, that eyes might miss.
Run hands slowly over the cat’s entire body, pressing gently through the fur. Search the groin, between toes, and under the tail. Ticks love these warm, hidden spots.
Run your hands slowly over your cat’s body, pressing gently through the fur to feel for hidden ticks.
A tick feels like a small, hard lump, often attached to the skin. This tactile check is a key part of tick prevention.
Remember, seasonal risk peaks from October to March in Australia, but ticks can be active year-round. So, make this a routine habit, especially after outdoor adventures.
It is simple, quick, and your fingers know the job. For extra protection, consider topical flea and tick treatments or oral tick prevention medications, though some collars offer contact-based protection that works without the pest needing to bite first.
Looking to buy tick control products? Check with your vet for the best cat-safe options.
How to Do a Full-Body Tick Check on Your Cat
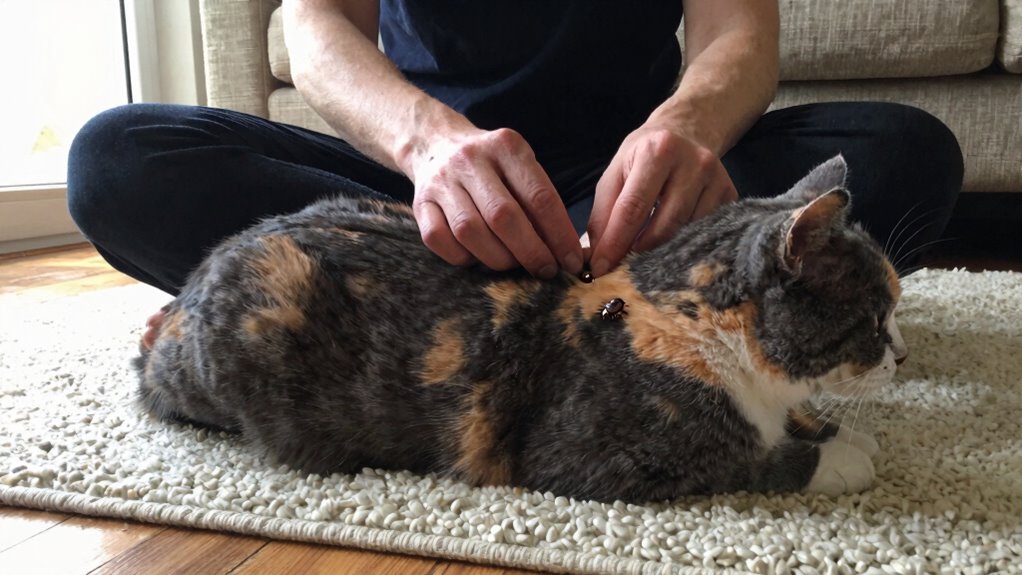
After running your hands down your cat to feel for lumps, the next step is visual inspection. This is where you play detective, looking for tiny hitchhikers.
Their size ranges from a sesame seed to a grape after feeding. Check the face, ears, and neck first with a bright light.
Ticks love warm, hidden spots. Think of it as a spa treatment with a purpose but with a practical need for pest control.
Part the fur systematically and inspect skin patches, especially darker areas. A tick’s color blends in, so squint a little.
Focus on legs and paw pads because between toes is a favorite hangout. You might find one clinging like a stubborn burr.
After removal, apply a topical disinfection to the bite site. As a preventative measure, use a monthly topical repellent for ongoing flea and tick protection.
It is cheap insurance for peace of mind and a key part of any cat pest control routine. For persistent indoor pests, you can also use boric acid powder applied behind appliances to eliminate ants and roaches safely.
Where Ticks Hide on Cats (Common Spots to Inspect)
Cats have a talent for hiding ticks in their warmest, darkest spots, like skin crevices such as armpits, groin folds, and under the collar’s edge.
Those little arachnids also love paw and ear cavities, so check between toes and inside ear flaps where skin is thin and cozy.
A quick finger sweep through these areas, feeling for tiny bumps, saves a cat from an unwelcome hitchhiker.
For effective pest control, inspect these common hiding spots during every grooming session.
Use a tick removal tool to safely extract any found pests.
Regularly checking these topical entities keeps your cat free from disease risks and discomfort.
Buying a preventive flea and tick treatment can stop infestations before they start.
Always consult your vet for the best product for your cat’s needs.
20% Picaridin sprays provide up to 12 hours of effective tick protection and are safe for use around cats when applied to gear or clothing.
Warm Skin Crevices
Tick hunting is a tactile game of hide and seek, and cats are notoriously good at hiding. Warm skin crevices like armpits, groin folds, and under the chin are perfect tick hideouts because they are humid, dark, and protected.
Humidity levels and seasonal patterns directly affect tick activity, so check these spots more often during spring rains or mild winters. Armpits and leg pits are prime real estate for ticks because they love warm, sweaty folds where fur is thin and skin is soft.
The groin and inner thigh area is a high humidity zone often overlooked until a tick becomes engorged. Skin folds under the chin or neck are easy to miss if a cat’s collar hides them.
Run your fingers slowly, feeling for tiny bumps in these moist pockets. The warm, damp environment is a tick’s spa day, so do not skip these hidden hotspots for pest control success. To maintain a lasting barrier, you can reapply a permethrin yard spray every 2 to 4 weeks for consistent pest control.
Paw and Ear Cavities
A cat’s paws and ears are like tiny, furry caves: dark, warm, and perfect for a tick’s quiet meal. The ear anatomy, with its convoluted ridges, provides ample hiding spots, especially deep inside the ear flap.
Paw grooming can miss ticks tucked between toes or pads, so a manual check is your best defense. For effective flea and tick prevention, pair this inspection with a vet-recommended topical treatment monthly.
| Spot | Why Ticks Hide There | Checking Tip |
|---|---|---|
| Between toes | Warm, protected, hard to groom | Part toes gently, look for dark lumps |
| Paw pads | Thick skin, low visibility | Run a finger along each pad |
| Ear flap interior | Dark, folded skin | Lift ear, inspect with flashlight |
| Ear canal entrance | Warm, humid | Look inside without poking |
| Skin folds near ears | Trapped debris | Feel for small bumps |
Check each paw like a detective, not a masseuse: ticks there are tiny, but their bite is loud. Use a bright light and slow, deliberate pressure to avoid squeezing the tick’s body.
Inspect ear cavities last, as they’re prime real estate for hidden pests. For complete pest control coverage, apply a spot-on product that targets both ears and paws before outdoor season.
If you find a tick, remove it with fine-tipped tweezers and clean the area with antiseptic. Then, monitor for redness or swelling over the next week.
For recurring issues, ask your vet about oral tick preventives or collars that repel across these tricky zones. Always check paws after hikes, and make ear checks part of your weekly grooming routine.
Buyer-intent tip: choose a fast-acting tick killer that lists “ear folds” and “toe webs” on its label for targeted protection. Reapply exactly as directed, because missed spots become tick motels.
Finally, keep a tick removal tool in your pet kit, and reward your cat with a treat after each check. Consistency turns this 5 minute scan into a habit that keeps your furry friend bite-free.
A spray containing natural essential oils can also target ear and paw areas during routine checks.
How to Remove a Tick Safely From Your Cat
When you spot a tick on your cat, stay calm and remove it with precision. Understanding tick anatomy and the egg to adult lifecycle helps you avoid common mistakes.
Use fine-tipped tweezers from the drugstore for the best pest control results. Grasp the tick at the base, right next to your cat’s skin, without squeezing its bloated body.
Pull steadily upward with even pressure. Do not twist or jerk, or the mouthparts may break off and cause infection.
Dispose of the tick in rubbing alcohol or flush it down the toilet for effective pest removal. Clean the bite area with soap to prevent irritation and support healing. Permethrin-treated clothing and gear can also reduce tick bites by nearly 74 percent, offering durable protection for outdoor activities.
Signs of Tick Paralysis in Cats (When to Call a Vet)
Even the most thorough tick check can miss a freeloader, so knowing the warning signs of tick paralysis is your cat’s best shot at survival.
The symptom onset timeline is brutally short: hind leg wobbles can appear within 24 to 48 hours after a tick attaches.
That unsteady stagger often comes with a dry cough or a gurgling meow, not unlike a hairball with attitude.
Some cats skip the wobble entirely and cough first; don’t wait for full paralysis.
This toxin targets nerves fast, so using a vet-approved tick prevention product is your best defense.
But once symptoms show, that ship has sailed for prevention.
Call your vet immediately, not after coffee.
Delaying risks respiratory failure, and no one wants that tab.
Bottom line: if your cat’s gait goes goofy or the cough sounds weird, skip Google and head straight to the clinic.
Quick action and regular pest control treatment can save your cat’s life, and applying DEET-based products can protect against ticks for up to 12 hours.
How to Prevent Ticks on Your Cat All Year

The most reliable tick prevention starts with a vet‑approved topical or oral product, applied or given year‑round without seasonal shortcuts. This isn’t just a suggestion; it’s the single biggest barrier between a cat and paralysis ticks, which don’t respect calendars.
Effective tick prevention demands consistency, even when those little arachnids seem scarce. Tick repellents are not optional extras for keeping pests away.
Topical spot‑on treatments like Frontline or Revolution cost around $15 to $25 per dose and go between the shoulder blades. One dose lasts a month, killing ticks on contact before they can get cozy.
Oral chews such as Credelio cost about $20 monthly and work systemically to protect from the inside out. They taste like treats, so there is no mess or struggle with a happy crunch.
Environmental control means mowing lawns and keeping the cat indoors during peak tick season from October to March. For the best pest control results, pick one product, use it year‑round, and skip the seasonal guesses. Using permethrin-treated gear for your own clothing can also reduce tick exposure when handling your cat outdoors.
Frequently Asked Questions
Can Indoor Cats Get Ticks?
Yes, indoor cats can get ticks and are still at risk.
The indoor cat risk is lower than for outdoor cats, but it is very real.
Ticks hitchhike inside on humans, other pets, or even through window screens.
That is why tick prevention is still critical for indoor cats.
Monthly spot on treatments or tick collars work well and cost around $15 to $30.
Check your cat’s coat weekly with a fine toothed comb, especially after someone comes inside from a walk.
A single tick can cause paralysis, so do not let the word indoor lull you into skipping this simple step.
For the best pest control results, ask your vet about products with buyer intent phrases like “fast acting flea and tick prevention” or “long lasting cat tick collar.”
Look for topical treatments that repel and kill ticks, not just fleas.
This way, you protect your indoor cat without worrying about side effects from harsh chemicals.
What Should I Do if the Tick’s Head Breaks Off?
If the tick’s head breaks off during removal, avoid panic. Instead, use a proper tick removal tool like a fine-pointed tweezer to grasp the head as close to the skin as possible.
Pull straight out with steady, even pressure without twisting. If the head is stuck and you can’t grab it, leave it alone; the body will often expel it naturally over time.
Watch for signs of infection like redness, swelling, or pus at the bite site. Clean the area daily with an antiseptic and monitor it closely.
Most cases heal fine without issue, but if you see severe symptoms or suspect Lyme disease, visit your vet immediately. A broken head is annoying, not a crisis, but using the right tick removal products can prevent this problem in the first place.
How Often Should I Check My Cat for Ticks?
In tick season, daily checks are ideal for catching ticks before they bite. Run your fingers through the coat every evening like a quick grooming routine.
This helps you remove ticks before they attach firmly. For indoor cats that rarely go out, every other day suffices.
Missing a day isn’t the end of the world. Ticks aren’t ninjas, just persistent hitchhikers.
The key is consistency, not perfection. If daily feels paranoid, fine, every other day works.
Start at the nose and end at the tail. For the best protection, combine checks with a vet approved flea and tick prevention product.
You’ll want to shop for a topical spot on or oral medication that targets ticks. Look for products with fast acting ingredients like fipronil or fluralaner.
Smart buyers also pair prevention with a fine toothed tick comb for hard to spot areas. Your cat’s health depends on this simple routine.
Can Ticks Transmit Diseases Other Than Paralysis?
Yes, ticks can transmit diseases beyond paralysis, so tick control is crucial for your cat’s health. Tick season heightens Lyme risks, though Lyme disease is rare in cats, as Borrelia burgdorferi bacteria may cause fever or lethargy.
Other pathogens like Anaplasma or Babesia can infect your cat, leading to anemia or joint pain. Symptoms often mimic the flu, mild but sneaky, making early detection tricky.
These diseases are less common in Australia than paralysis, but any tick bite carries a small chance of illness. Watch your cat closely for risk, not just for symptoms.
Bottom line: prevent ticks year-round with a reliable tick prevention product. Using a spot-on treatment or tick collar is the best way to stop bites before they happen.
For effective pest control, choose a product specifically labeled for cats. That smart purchase keeps your pet safe and reduces buyer remorse.
Is It Safe to Use Tick Prevention Products on Kittens?
Kittens can tolerate tick prevention products, but safe usage starts at 8 weeks old and a weight of at least 2 pounds. Always check the label for these two minimums before buying any tick control for your tiny feline.
Application method matters a lot with spot on treatments like Frontline, which costs between $15 and 25. You apply it between the shoulder blades, not on fur they can lick off.
Your kitten’s chaotic energy doesn’t need extra setbacks, so vet recommended formulas beat generic store brands every time. Consider a quality topical flea and tick treatment to avoid irritation or accidental ingestion.
Bottom line is to read the label carefully and skip cheap sprays that may cause skin reactions. With the right pest control product, your tiny tiger stays tick free with no paralysis worries.


