
Checking a dog for ticks doesn’t have to be complicated or gross—it’s a simple five-minute routine that can save your pet from serious illness. A daily check for these tiny pests targets their favorite hiding spots: warm ears, armpits, groin, and between the toes.
You’re feeling for a hard pea or soft grape bump, then parting the fur to spot a reddish-brown hitchhiker with tiny legs. To remove it safely, use fine-point tweezers or a Tick Twister and pull straight out—no twisting, squeezing, or home remedies like matches or petroleum jelly.
Clean the bite with disinfectant, save the tick in rubbing alcohol, and let your vet identify it. With the 24-to-48-hour Lyme transmission window in mind, this quick check is your best defense.
Stick around—the tricky parts and pro removal tips are coming up next.
At A Glance
- Check daily during warm months, focusing on ears, armpits, groin, and between toes.
- Feel for tiny, hard bumps under the fur using firm, slow pressure with your fingers.
- Part the fur with both thumbs to reveal skin, looking for poppy-seed-sized or grape-like bumps.
- Remove any tick immediately with fine-point tweezers, pulling straight out without twisting or squeezing.
- Clean the bite with disinfectant after removal and save the tick in rubbing alcohol for vet testing.
How Often Should You Check for Ticks?
Checking a dog for ticks daily during warm months is ideal. Peak tick season timing runs March through October, when temperatures stay above 32°F for over 24 hours after a freeze.
Warm, humid summer weather spikes the need for thorough tick checks. In low-risk areas or during consistent freezing temperatures, once weekly checks are enough.
Year round prevention remains fundamental because disease can transmit before a tick dies. Even with topical preventives, regular tick checks reduce infection risk through early detection.
Year-round prevention is fundamental, as disease can transmit before a tick dies.
After outdoor activity in grassy or wooded areas, perform immediate checks. Low risk winter conditions allow you to scale back to weekly inspections.
The bottom line is that daily checks work best during tick season. But if weather is brutally cold, weekly checks still provide solid protection. Using stainless steel tools that can be sterilized prevents cross contamination during these checks. There is no need to be paranoid, just be thorough with every inspection.
Tick Hotspots: Where to Look First on Your Dog
Start with the head, then work down the body. Ticks love warm, hidden spots where skin is thin.
Understanding tick anatomy helps identify them early: they attach with mouthparts, swelling through engorgement stages from flat to grape-like. Check these three hotspots first.
- Ears – Inside and outside flaps are prime real estate. A tick here looks like a new mole.
- Armpits and groin – Dark, protected areas that attract pests. Run your fingers slowly against the fur to feel any bumps.
- Between toes – Ticks often crawl up from grass. Spread each toe to reveal a tiny grey pea hiding there.
Dad joke: A tick’s favorite game is hide-and-seek, and it always wins round one.
Bottom line: Check these zones daily, especially after walks in tall grass or woods. Finding engorged ticks early reduces disease risk. Use fine-tipped tweezers or a tick removal tool, never squeeze the body.
What Does a Tick Look Like on Dog Skin?
Now that you know where to hunt, the next step is knowing what you’re hunting for. A tick on dog skin looks like a small, reddish brown, greyish, or black bump.
Tick size ranges from a poppy seed when unengorged up to a pea or even a grape when swollen with blood. Tick color can shift from tan or brown to a darker, shinier black or grey as it feeds.
You’ll often see tiny legs poking out from the bump’s edge. The skin around might be red or slightly swollen.
A tick is not a mole or a skin tag, it is a temporary, hitchhiking parasite. Think of it as a tiny, eight legged freeloader that does not pay rent.
If you suspect a pest problem, targeting removal with a reliable tick removal tool is key for effective flea and tick control. Spot it, remove it, and consider a topical treatment for ongoing protection. A monthly oral chew like NexGard kills fleas quickly before eggs are laid and controls ticks for a full month.
How to Feel for Ticks With Your Hands
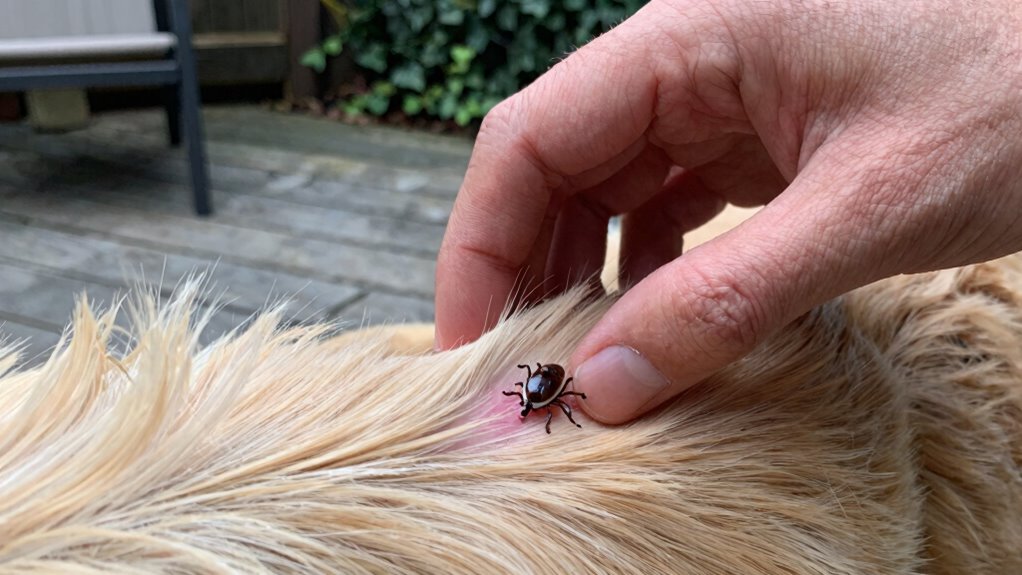
Running your hands over the dog’s body is the first move for hands-on palpation, feeling for small bumps or irregularities on the skin. The key is to use firm, slow pressure, pressing down enough to detect a tick’s body beneath the fur, which often feels like a tiny, hard pea.
When a suspicious bump is found, part the fur for a closer inspection. This parting fur inspection is where you confirm if it’s a tick or just a benign scab.
For effective pest control, always check high-risk areas like the ears and armpits after your initial sweep. If you are hunting for ticks during flea and tick season, use your fingertips to probe the skin carefully.
A sudden bump that doesn’t move with the skin could be a buried tick head, which requires proper removal. For beginner pet owners, consider using a tick removal tool as a safe alternative to your hands. Pretreating clothing and gear with permethrin products can reduce tick bite risk by over 70%.
Hands-On Palpation
You can’t always see a tick, especially when it’s buried in thick fur, so your hands become your best detection tool.
Palpation means gently pressing your fingers across the skin to feel for small, hard bumps that stick out oddly.
These bumps might be ticks, and catching them early cuts down on tick-borne disease risks.
For effective pest control, press slowly using flat fingertips, not nails, to avoid mistaking fur mats for ticks.
Focus on warm, hidden zones like the ears, armpits, groin, and toes where ticks love to latch.
Note any lump with a slight give; an engorged tick feels soft like a grape, not a speck.
Skin inflammation or redness around a bump signals a bite.
Daily checks beat seasonal prevention alone, and preventive medication helps but isn’t bulletproof.
Feel first, inspect later.
Your hands save the day.
Remember that 20% Picaridin repellents provide up to 12 hours of defense against mosquitoes and ticks.
Parting Fur Inspection
Palpation alone won’t catch every tick, so parting the fur for a close visual inspection is the critical second step. A good parting technique involves using both thumbs to spread the hair, revealing the skin beneath.
Fur density and coat length dramatically affect how easily you can see; short, single-coated breeds are simpler, whereas thick double coats require patience. Matted fur acts like camouflage, obscuring ticks, so regular grooming habits prevent this and keep your flea and tick control routine effective.
Here is a quick guide:
| Coat Type | Parting Difficulty | Tick Visibility |
|---|---|---|
| Short, smooth | Easy | High |
| Medium, double | Moderate | Variable |
| Long, silky | Hard | Low |
Focus on high-risk zones: toes, ears, armpits, and groin. If you spot a swollen, dark bump, treat it as a tick until proven otherwise, and consider a vet visit for removal guidance.
For long-haired or dense-coated pets, a fine-toothed comb can help lift hair away from the skin for a clearer view. This is where many pet owners search for a reliable tick removal tool, so keep one in your grooming kit.
Pair this inspection with a monthly topical preventative to reduce live tick encounters, and you’ll catch stragglers before they attach. Buy a good tick twister or hooked remover online to make extraction safe and quick.
Check behind the ears and between toes every time you come inside from a walk, especially in grassy or wooded areas. That habit alone saves you from the hassle of an embedded tick and a potential vet bill.
Step-by-Step: How to Remove a Tick Safely
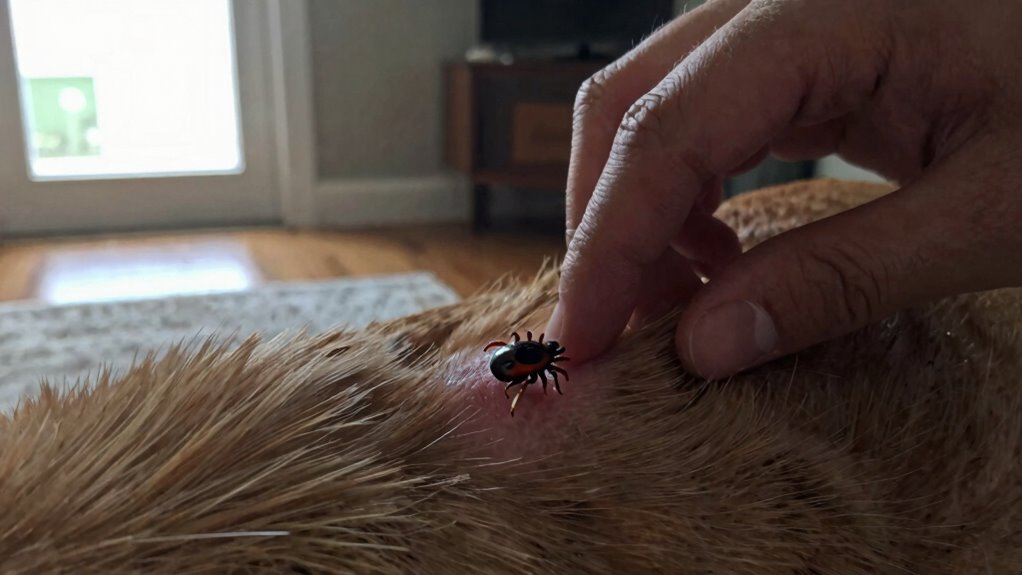
To remove a tick safely, start by picking the right tool for the job. Disinfected tweezers or a specialized tick remover under ten dollars ensure a clean grip.
After the tick is pulled out, focus on proper aftercare for the bite area. Clean the site with soap and water to prevent infection.
Saving the tick for your vet is a smart step for pest control monitoring. Permethrin-treated clothing lasts up to 70 washes and provides long-lasting protection against ticks and other insects.
Always check your skin and clothing after time outdoors in tick habitats. Quick removal reduces the chance of Lyme disease or other tick borne illnesses.
Proper Tick Removal Tools
For safe tick removal, having the right tool is as important as a steady hand. No, that doesn’t mean a pair of kitchen tweezers you last used to splinter a coffee table.
Dedicated tick removal tools give precise, safe gripping close to the dog’s skin. This prevents the tick’s mouthparts from breaking off, reducing infection risk.
The Tick Twister is a curved plastic fork that slides under the tick’s body. Grip close, then twist gently, and a two-pack costs about $10.
Fine-point tweezers should have pointed, angled tips expressly labeled for tick removal. They allow safe gripping without crushing the body, and brands like Ticked Off cost $8 to $12.
A tick key is a small metal disc with a V‑shaped notch. Slot the tick in, push flush to the skin, then pull straight, and it runs $6 to $8 on keychains.
Avoid blunt tweezers: they squeeze and risk infection. Bottom line: buy one of these tick removal tools today.
They are cheap, effective, and far less stressful than a DIY disaster. Check the label for a vet recommended spray to use after removal for ongoing protection. Order your preferred option now for safe pest control at home.
Post-Removal Care Steps
You’ve got the tick out, and your dog likely thinks you deserve a treat. But post-removal care isn’t over.
First, clean the bite with disinfectant. Then consider applying an antibiotic ointment to reduce infection risk. Just don’t let your pup lick it off.
Take a clear photo of the bite site for a time-stamped reference. If swelling or redness appears later, you’ll have that visual for your vet.
Save the tick in rubbing alcohol for possible identification. Monitor your dog for symptoms like limping, fever, or low appetite over the next few weeks.
If the bite doesn’t heal or looks angry, call the vet for professional pest control guidance. Natural sprays offer quick, safe options for ongoing prevention, though they require reapplication every two hours. Bottom line: clean the wound, apply ointment, photograph, and watch. Then give that treat.
What to Do If the Tick’s Head Stays Stuck
Monitor the bite area daily for the next week.
Clean gently with antiseptic; avoid scraping or gouging.
Call a vet if redness spreads or the dog seems sore.
If it looks angry, a vet can remove it cleanly for a small fee.
Otherwise, let nature take its course.
Focus on healing, not trophies.
No need to save the head.
For reliable pest control advice, keep topical treatments in your home supplies.
For extended fabric protection, consider a permethrin-based treatment for your dog’s bedding or gear.
Should You Save the Tick After Removal?
Saving the tick after removal feels unnecessary until your dog starts showing symptoms. A vet can test it for Lyme disease and other pathogens to speed up treatment.
Drop the tick in a sealed bag or a small vial of rubbing alcohol, then label it with the date. 70% isopropyl alcohol is recommended for safe, effective disinfection and preservation of the tick for testing. This simple pest control step can save your dog from weeks of guesswork and expensive diagnostics.
Store it in a ziplock bag, pill bottle, or jar with a tight lid. Always write the removal date on the container to track exposure times.
Keep the tick for about a month, then toss it if your dog stays healthy. That little corpse is cheap insurance against later complications from tickborne illnesses.
Signs Your Dog Is Sick After a Tick Bite
Even if a tick was removed cleanly, symptoms can still sneak up days or weeks later. That is the sneaky part, ticks are like uninvited guests who leave a mess behind.
Even if a tick is removed cleanly, symptoms can still creep up days or weeks later.
Watch for these red flags that signal an infected bite or disease. If you need pest control for your yard, consider a topical treatment to reduce tick exposure.
1. Fever and lethargy – Your dog might feel warm to the touch, act tired, or lose interest in play. A normal temp is 101 to 102.5°F, anything higher is a clue.
2. Limping or swollen joints – Lyme disease often causes a sudden, shifting lameness. One leg may be sore today, another tomorrow.
You might notice them favoring a paw or stiff after naps. A good flea and tick preventive can help avoid tick borne illnesses.
3. Loss of appetite or vomiting – If they skip meals or throw up, especially with diarrhea, tick borne illness could be to blame.
These signs do not always appear together, so trust your gut. A quick vet check is smarter than waiting for a mystery to solve itself.
For ongoing protection, ask about topical pest control products that target ticks directly. Persistent symptoms mean you should buy a reliable flea and tick treatment today. Many sprays are safe for pets and kids once dried, making them a convenient option for reducing tick exposure around your home.
When to Call the Vet After Finding a Tick
Once you’ve pulled that tick off, you aren’t done yet. Now it’s time to watch like a hawk for any trouble.
If your dog shows fever, limping, swollen joints, or a sudden loss of appetite, a vet call is non‑negotiable. Remember, not every tick carries disease, but erring on the side of caution keeps a bad day from becoming a worse week.
For ongoing flea and tick prevention, consider a topical spot‑on treatment or a vet‑recommended oral chew to reduce future bites. If you’re unsure which product fits your pup’s lifestyle, ask your vet about fast‑acting flea and tick control options during your next visit. Long-lasting repellents like those found in premium collars can also offer eight months of continuous protection for outdoor pets.
Keep a tick removal kit handy and check your dog’s coat after every walk in wooded or grassy areas. That way, you’re already ahead of the game before any symptoms start.
Monitor for Symptoms
After you have removed the tick, the real job is not over. It has just shifted to a waiting game for pet pest control.
The key is watching for symptoms without panicking. Most ticks are harmless, but some carry diseases that require treatment.
Pay attention for the next few weeks. A fever or lethargy in your tired, pup might signal trouble.
Limping or swollen joints often lead to Lyme disease testing. A sudden lameness is a common first sign.
Loss of appetite is a red flag for any topical pest issue. Skipping meals means you should monitor closely.
Tick species identification helps your vet choose the right treatment. Save that tick in a baggie for their pest evaluation.
Most dogs stay fine, so stay calm. Call your vet if symptoms appear after tick removal.
It is like waiting for a pizza, except cheaper and with less cheese. Bottom line: stay calm, monitor closely, and act fast if something seems off.
Using a shampoo like Hartz UltraGuard Pro can provide up to four weeks of protection to prevent re-infestation after tick removal.
Veterinary Consultation Needed
A phone call to the vet is not an overreaction. It is smart triage for your pet’s health.
If that tick was attached longer than 24 hours, a veterinary consultation becomes non-negotiable. Ticks can transmit Lyme, anaplasmosis, and ehrlichiosis before they die, even with preventives.
The vet may recommend tick disease testing. This simple blood draw runs around $50 to $100.
It checks for antibodies, spotting infections early when treatment is easiest. Watch for lethargy, limping, or a fever within weeks.
Call if you see any signs. No need to panic, but a quick chat saves headaches later.
One phone call now beats a month of antibiotics later. After any tick find, call the vet.
A little caution buys a lot of peace of mind. Protect your pet and your household.
Permethrin-treated clothing can also help reduce tick exposure on future outdoor trips, offering long-lasting protection against these pests.
Why Daily Tick Checks Prevent Lyme Disease
Daily tick checks do more than just find ticks. They stop Lyme disease before it starts.
It takes 24 to 48 hours for a tick to transmit the bacteria. Daily removal beats that window.
A tick attached for less than a day is far less likely to pass on Lyme. Each check is a critical, time-sensitive defense.
Early removal cuts off disease transmission. A tick found at 12 hours is usually still safe.
Tick testing can later confirm infection risk. But daily checks prevent the need for that test altogether.
Consistency matters since one missed day can be enough. Checks keep the odds in your favor for effective pest control.
Think of it like checking a leaky faucet. The sooner you spot the drip, the less damage.
Some collars kill pests on contact, providing an additional layer of fast pest control results while paired with daily checks.
Why Prevention Alone Isn’t Enough: The Role of Checks
Prevention is a solid first step, but it’s not a magic shield. Even the best flea and tick preventives can fail, leaving a dog’s natural immunity exposed.
Ticks can still bite and transmit disease before a preventive kills them, especially in tall grass or woods. Daily checks catch these hitchhikers early, within 24 hours, drastically cutting infection risk.
Think of prevention as a wobbly umbrella in a storm. It helps, but you will still get wet without scanning under the collar, between toes, and inside ears.
A quick hands on feel for bumps costs zero dollars. Yet it is your best backup plan for pest control.
Do not rely solely on chemicals. Pair them with regular inspections to truly protect your pup from tick borne threats.
What Not to Do When Removing a Tick
Removing a tick does not reward creativity or risky experiments. Improper tick removal can backfire by leaving the head embedded or causing infection.
Twisting or jerking the tick often leaves mouthparts behind. This increases the risk of disease and infection for your dog.
Squeezing the tick’s body is a major mistake. A crushed tick can force infected saliva back into your pet.
Never use matches, petroleum jelly, or alcohol on the tick. These irritants make the tick vomit, raising disease transmission odds.
The only safe method is gentle, straight-out pulling with tweezers. This protects your dog from tick-borne illnesses and skin damage.
Frequently Asked Questions
Can Ticks Bite Through Clothing on Dogs?
Ticks cannot bite through a dog’s clothing because their mouthparts just aren’t strong enough to pierce fabric. However, their barbed feeding tubes let them crawl into openings like sleeves or collars easily.
Clothing creates a barrier but is not foolproof against these sneaky pests. If a tick finds exposed skin, immediate embedded tick removal becomes necessary.
For dogs in tick prone areas, tick repellent treated clothing is a smart way to reduce risks. Daily tick checks remain critical to catch hidden ticks before they feed.
A snug fit helps block entry points, but vigilance is your real armor. Investing in professional pest control products like permethrin treated gear can improve your dog’s protection.
When shopping for tick prevention, look for gear labeled with effective topical barriers. Remember, no single solution works alone; combine clothing with spot on treatments or oral preventatives for best results.
How Long Does a Tick Need to Be Attached to Transmit Disease?
The transmission timeline for tick-borne diseases varies, but the infection risk window typically opens after 24 to 48 hours of attachment. For Lyme disease, it’s usually 36 to 48 hours, so time is your biggest ally in prevention.
Think of a tick as a slow-moving zombie, not a sprinting menace, because it needs hours to feed and transfer pathogens. That’s why daily tick checks after outdoor work or play can cut your risk dramatically.
A quick feel for bumps or scabs on your skin beats a vet visit or a doctor’s prescription later, every single time. For pet owners, using a fast-acting flea and tick prevention product monthly is a smart purchase that handles the problem before it starts.
If you’re buying pest control supplies, look for tick removal tools or repellents with DEET or picaridin for immediate skin protection. For your yard, targeted tick sprays and granules reduce habitat, which lowers the chance of attachment altogether.
Bottom line: remove ticks fast, ideally within 24 hours, using fine-tipped tweezers or a dedicated tick remover. Check your gear, pets, and skin after hiking, and treat clothing with permethrin for an extra layer of defense.
Timing is the secret to avoiding Lyme and other tick-borne illnesses, so make a habit of scanning nightly before bed. A one-minute check is cheaper and easier than any treatment, and it’s the best pest control strategy you can own.
Are Some Dog Breeds More Attractive to Ticks Than Others?
Yes, some dog breeds attract more ticks, but it’s not personal, it’s physics and chemistry. Coat length matters because ticks cling easier to longer, denser fur, giving them cover.
Skin oil composition also plays a role, as certain oils produce scents ticks find irresistible. For example, a Golden Retriever’s thick coat and oily skin make it a prime target compared to a short haired, drier skinned breed.
No breed is safe, but checking a Labrador retriever after a walk in tall grass is non negotiable. Ticks wait there, so daily tick checks are your best defense against infestations.
For reliable pest control, use a vet recommended topical treatment or a flea and tick collar with proven repellents. These products target the chemistry ticks love, breaking the attraction cycle.
To keep ticks off your dog, invest in a yard spray or granular barrier treatment. Buy a spot on formula that repels before ticks bite, and you’ll reduce the risk of Lyme disease.
Can Indoor Dogs Get Ticks Too?
Yes, indoor can absolutely get ticks, even if they never step outside. The risk is real for homebodies because ticks hitch rides inside on humans, other pets, or through open windows and door gaps.
That means tick prevention for indoor-only dogs matters just as much, since one tick bite can transmit serious illnesses like Lyme disease or ehrlichiosis. A daily tick check is your simplest first line of defense, and you should focus on warm, hidden spots like ears, toes, and under the collar.
Yes, it’s a bit boring, but it beats a costly vet bill and a miserable pet. So don’t skip the routine: it’s the quickest, cheapest insurance for a couch potato pup.
For smarter protection, consider a vet-approved topical spot-on treatment or an oral chew, both of which kill ticks before they can spread disease. If you’re comparing pest control products, look for ones with fast-kill claims and residual activity to cover your indoor environment.
You can also pair that with a home spray barrier around baseboards and entry points for extra peace of mind. That way, you’re not just reacting to a tick, you’re actively preventing an infestation inside your living space.
Buyer-intent shoppers often search for “best tick prevention for indoor dogs” or “safe flea and tick treatment for apartments,” and those products work well when applied monthly. Just remember that even the best tick killer won’t replace your hands-on check, so combine both for maximum protection.
Ultimately, indoor does not mean immune, and a few minutes of inspection plus a reliable preventive product keeps your furry friend safe. Act now, choose a trusted brand, and you’ll sleep easier knowing your indoor pup is tick-free.
What’s the Best Time of Day to Check for Ticks After a Walk?
The best time to check for ticks is immediately after your walk, especially after an evening outing. Ticks can attach within minutes, so a quick grooming session right at the door catches them before they burrow in.
Run your hands over your dog’s entire body, feeling for small, new bumps or scabs. Part the fur and inspect the high-risk zones: ears, between toes, under armpits, and around the collar.
Daily tick checks are a solid habit, but doing them post-walk is what actually slashes your Lyme disease risk. Don’t wait until later; a delayed check gives ticks time to feed and transmit pathogens.
For extra protection, pair your inspection with a fast-acting tick prevention spray or a vet-recommended oral repellent. Buy a fine-toothed tick removal tool now, so you’re ready to pull any hitchhiker out cleanly.
If you walk in tall grass or wooded trails, consider upgrading to permethrin-treated gear for you and a flea and tick collar for your pup. The goal is to break the tick’s lifecycle before it becomes a vet bill, so immediate checks plus preventive products are your smartest purchase.
For a seamless routine, keep a tick twister and a small flashlight by your back door. That way, you never skip the post-walk sweep, and you’re always ready to act fast.


